Creating the Wind-and Rain-Resistant Structural Envelope
The building envelope consists of the roof, exterior walls, and exterior doors and windows. Protecting the structural envelope during a storm is essential to preventing water intrusion associated with roof and window damage.
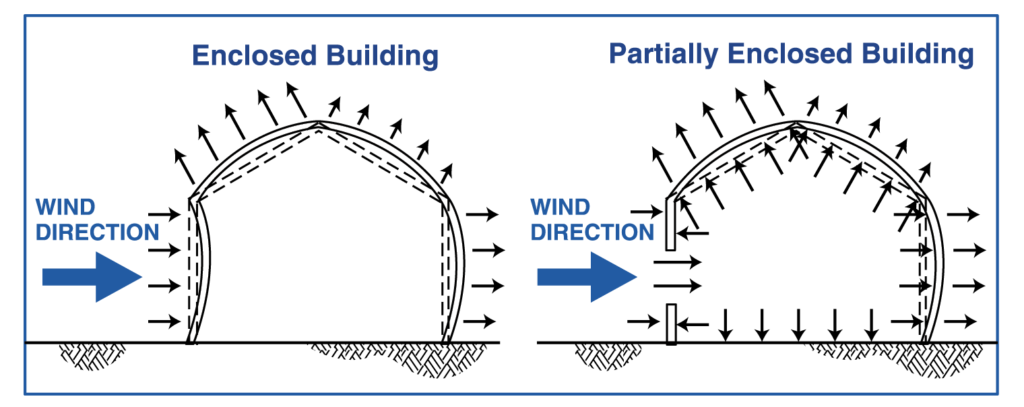
In Figure 4-1, the structure on the left has its wind- and rain-resistant envelope intact. Pressure on the walls and roof comes from the outside only. The wind- and rain-envelope for the structure on the right, however, has been breached due to a broken window. Now, pressure on the walls and roof comes from outside and inside the structure. The total amount of pressure on the roof and leeward wall increases significantly and can lead to the roof flying off and complete structural failure.
It is important to recognize that strengthening your home for wind resistance is a top-down process. Strong winds create uplift on homes and cause them to lift off the ground rather than fall over vertically. By connecting the highest components of the home with lower components, the connected system gets progressively heavier and harder for the wind to pick up. Wind design and retrofitting of homes should start at the top of the roof and work down, ideally into the foundation and the ground. Conversely, designing and retrofitting for flood protection are bottom-up processes, for which floodproofing and freeboarding are common techniques (see section 4.2).
Structural Stability
Roof Framing and Bracing
There are two common types of roof framing for a house (see Figure 4-2). Gable-end roofs have two flat ends that are A-shaped, and two sloped sides. Hip roofs have all four sides of the roof sloping towards the center of the roof. Hip-style roofs do not need as much bracing, as they are aerodynamically superior and have the bracing built into the design. During a hurricane, gable-end roofs are vulnerable to intense winds battering on their flat ends. If one of these ends collapses, it can damage or knock down other trusses in a domino effect.


Figure 4-2. Gable-end roof on the left. Hip roof on the right.
Source: retrieved April 24, 2018, from www.commons.wikimedia.org/wiki/Catagory:Roof_forms
Strengthening a gable-end roof is recommended and can be done by adding lateral and diagonal bracing. Figures 4-3 and 4-4 demonstrate gable end bracing. These images can be found in the FEMA brochure “Against the Wind” (FEMA 247). For lateral bracing, 2x4s are attached to the trusses and run the length of the roof. Several runs should be made from the ridge down to the wall; spacing depends on the height of your roof. Diagonal bracing runs from the top of the gable end to the bottom of the fourth truss, and from the top of the fourth truss to the bottom of the gable end.
Many FEMA publications can be found here. Additional information regarding roof bracing can be found at the Insurance Institute for Business and Home Safety (IBHS) website.
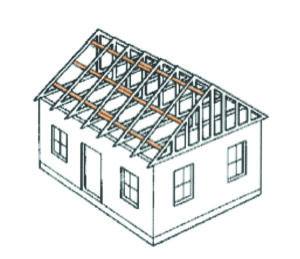
Figure 4-3. Lateral bracing consists of 2x4s running the length of the roof and overlapping where they meet each other.
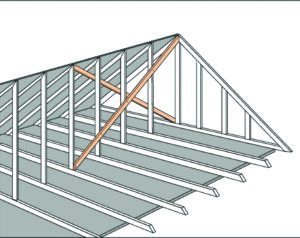
Figure 4-4. Diagonal bracing runs from the top of the gable end to the bottom of the fourth truss, and from the top of the fourth truss to the bottom of the gable end.
Continuous Load Path Connections
All houses have some connection from the roof to the foundation; otherwise, they would fall apart. The continuous connection from the roof to the foundation is often called a “Load Path” and it is analogous to a chain — it is only as strong as the weakest link. In response to recent hurricane damages, much stronger connections are now required to protect against hurricane winds. New homes are designed with continuous load path connections; older homes may need to be retrofitted to add load path components. The specifics of the continuous load path connection are illustrated in Figure 4-5. The roof is tied to the wall, typically with hurricane clips and plate ties. The wall of a higher story is tied to a lower story with straps. The walls are tied to the foundation with plate ties and anchors.
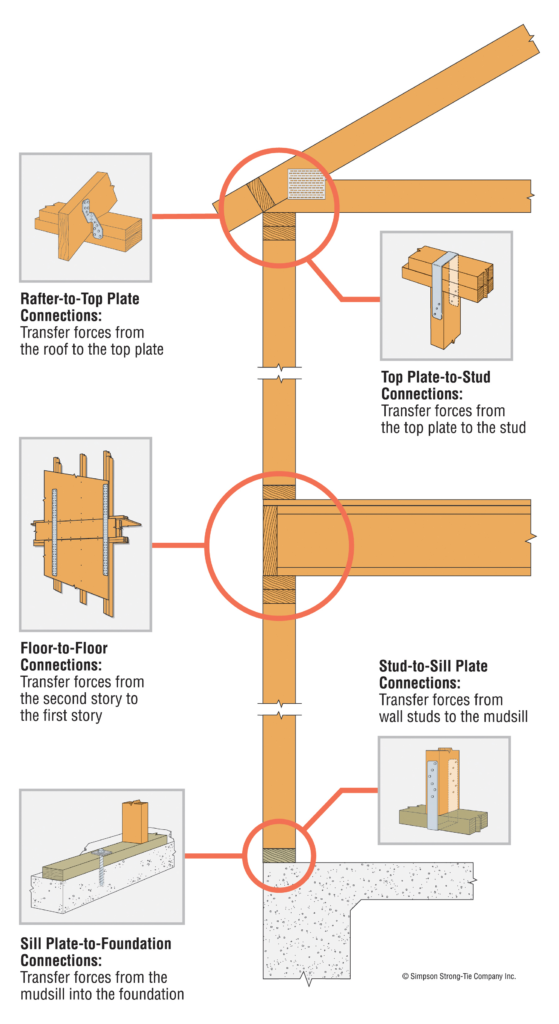
The weakest link for many homes is the roof-to-wall connection. The hurricane clip (aka hurricane tie) was created to improve this connection. There are several types of hurricane clips (Figure 4-6); which one should be used on your home depends on the design and the load of the house. A properly selected hurricane clip is required for each truss or rafter.
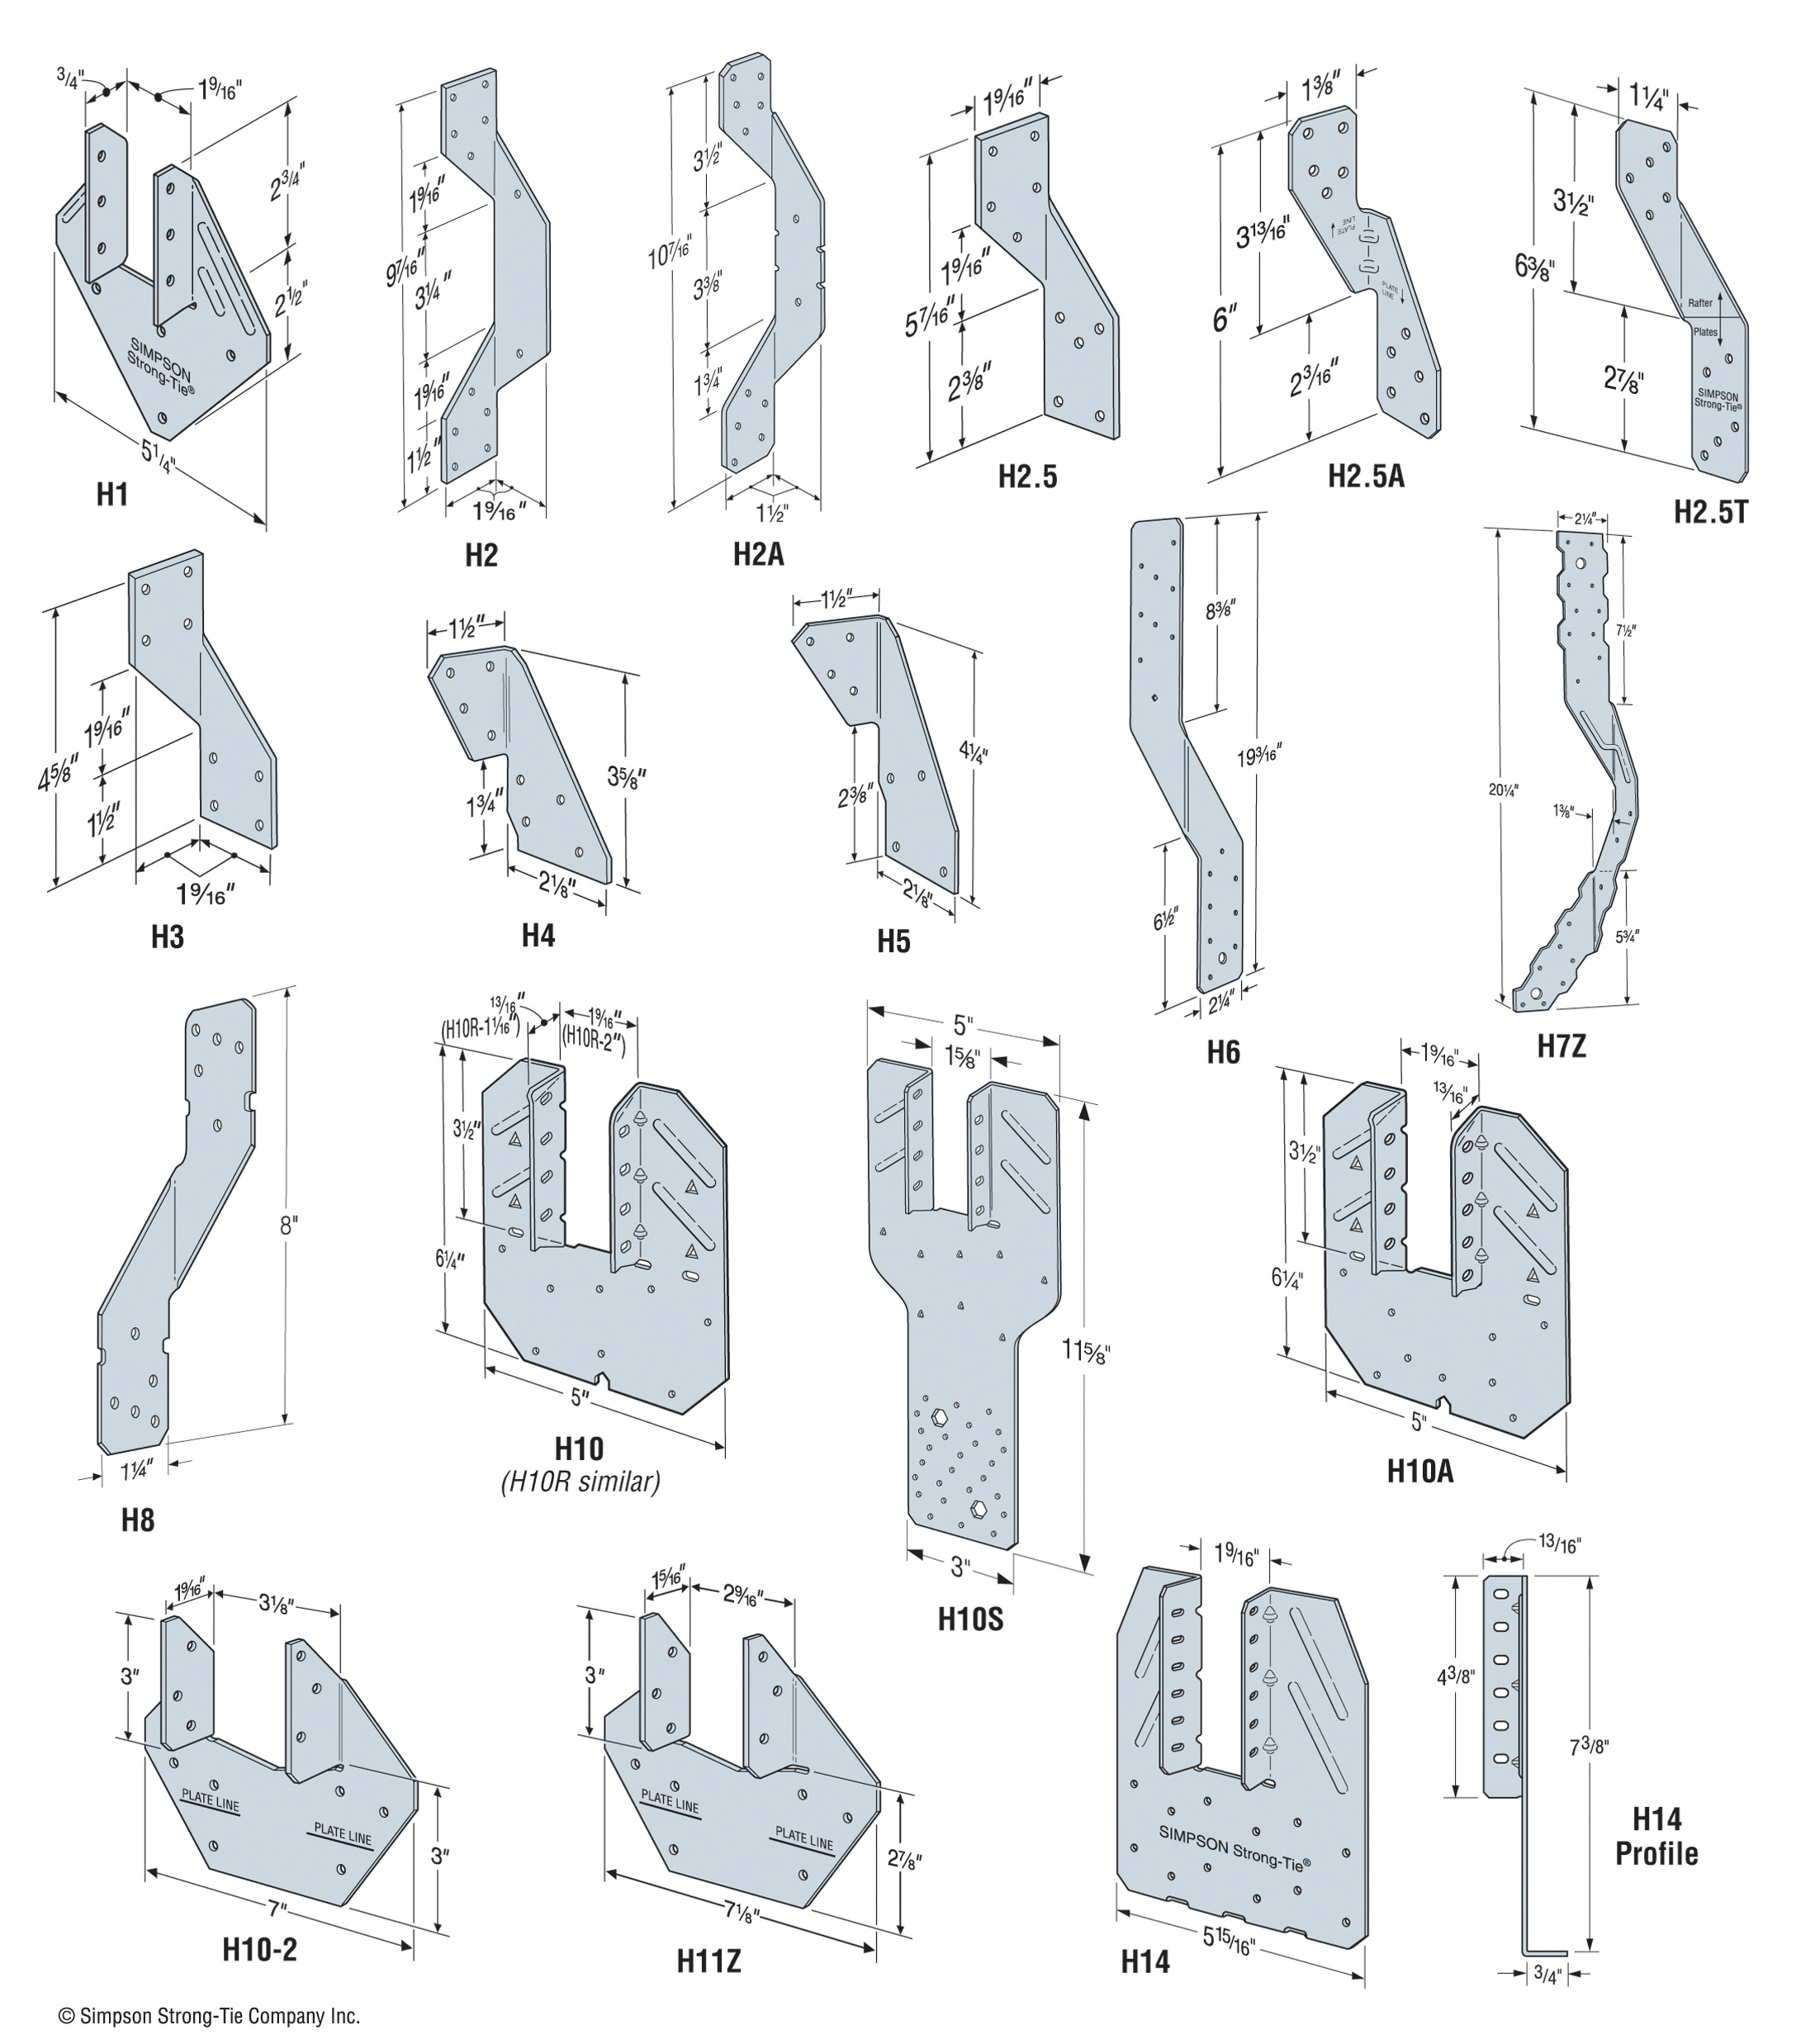
For older houses, it is possible to add load path connections. Each house is different but, in general, it will be easier and less expensive to put in hurricane clips than to add wall to foundation ties. Hurricane clips help to keep your roof from blowing off during a hurricane. Check with a licensed structural engineer or architect to determine what is a feasible retrofit for your house. You can then determine if you can do the retrofitting yourself, or if you will need to hire a licensed contractor.
Keeping Water Out
Roofing Materials
Several layers of materials add to the structural strength of a roof and keep water out from the interior of the house. After the roof decking goes on, the next layer on top is called an underlayment. Felt material is the most common underlayment that is paired with shingles. Synthetic roof underlayment recently began replacing traditional roofing felt. Synthetic materials were used as an expedient material for temporary roof repair after hurricanes in the southern United States. It was then discovered that they resisted tearing, moisture, and ultraviolet rays better than asphalt-saturated felt.
Window Coverings
Protection of your home’s envelope from breaches during a windstorm is critically important, particularly its vulnerable windows and doors. If your home is located in a windborne debris zone (any location where the basic wind speed for code purposes is 120 miles per hour or greater), it is important that window coverings not only withstand hurricane-force winds, but also withstand impacts. The usual standard for impact resistance is known as the “Large Missile Impact Test” as defined by several similar norms. Essentially, these tests determine whether a given shutter can withstand the impact of a 9-pound 2x4 fired at the shutter at 30+ miles per hour, followed by cyclic wind load testing.
Coverings that are installed should be tested and approved to meet industry standards for hurricane impact. Check with the manufacturer, and always use only licensed contractors and reputable dealers.
The International Hurricane Protection Association (a trade association group comprising manufacturers, contractors and other industry professionals) has several tips regarding selection of projects, selection of installing contractors, and other useful information on its website.
Several types of window coverings available are described on the following pages. Within each category, numerous reputable manufacturers provide different products, each with individual features, benefits, and cost. Pricing will vary between providers and will change over time. We encourage you to consult with a competent contractor specializing in supplying and installing these systems.
Roll-Down Shutters
Roll-down shutters represent the window covering type that is easiest to deploy and offers the best overall protection features (Figure 4-7 and 4-8). These are permanently attached to the building. The shutter consists of a movable “curtain” of slats that is held in place by vertical tracks. When not deployed, the shutter stores in a hood that is housed above the window or door being protected. Most of the components of roll-down shutters are made from extruded aluminum.
Because the roll-down shutter makes solid contact with the window sill, patio deck or other structure at the bottom, this shutter type demonstrates the highest level of protection against wind-driven rain in addition to wind and debris. Roll-down shutters can be deployed using a variety of operators, both manual and electric motor types. These can be installed directly over windows and doors, or in some cases, at balcony’s edge to form an enclosure.
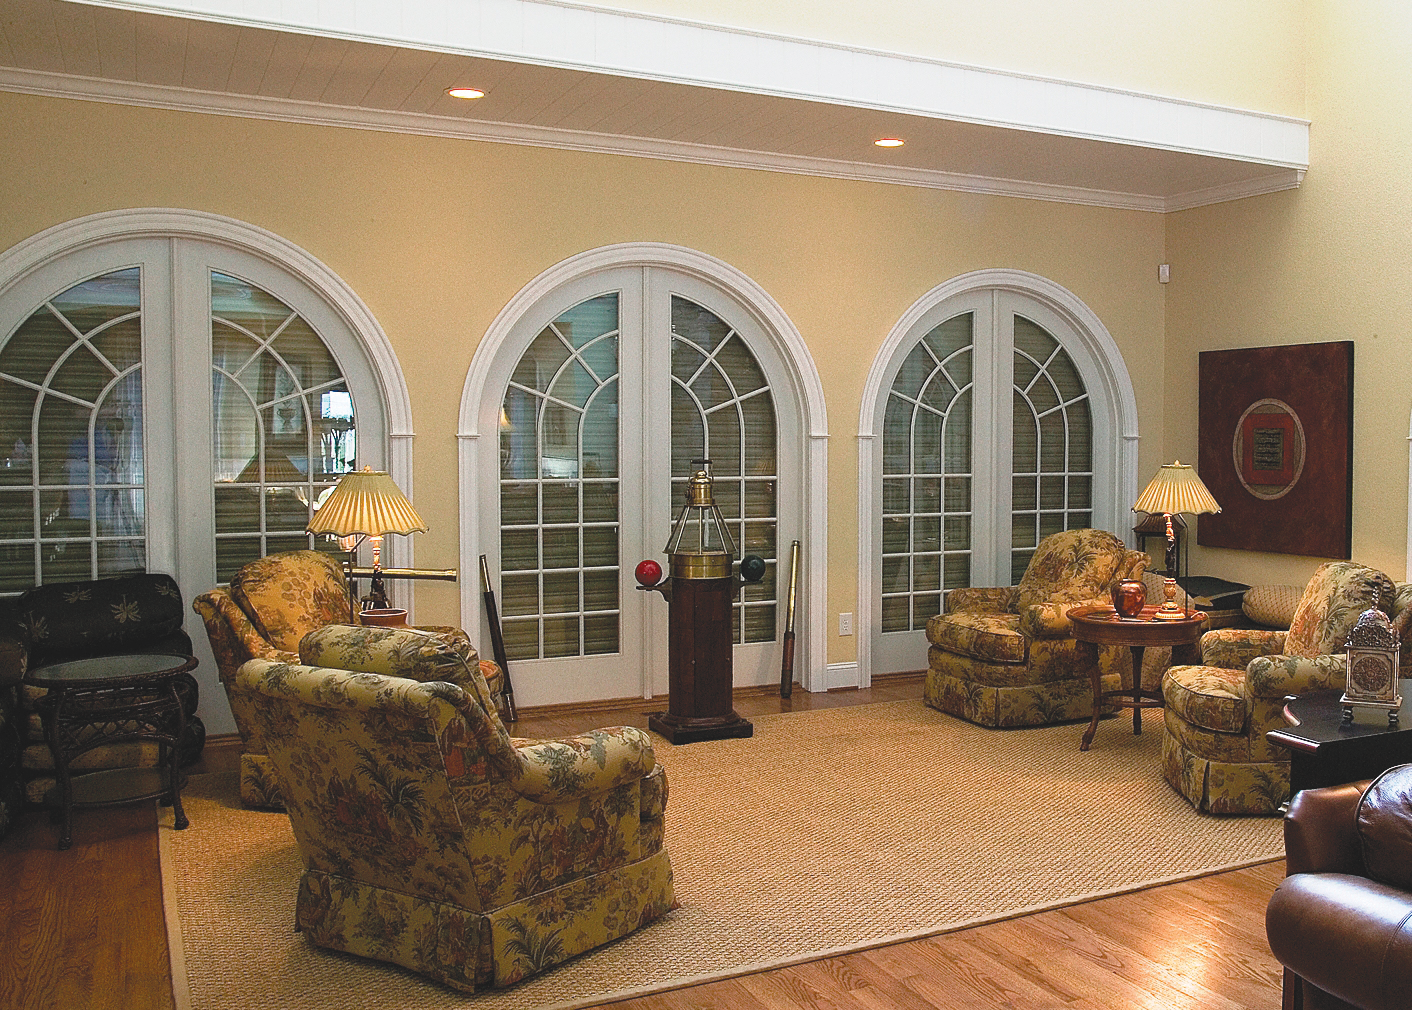
Figure 4-7. Interior of home with deployed roll-down shutters. Roll-down shutters can be used not only for storm protection, but also for security, privacy, light, heat, and noise control.
Source: Roll-a-way/QMI.
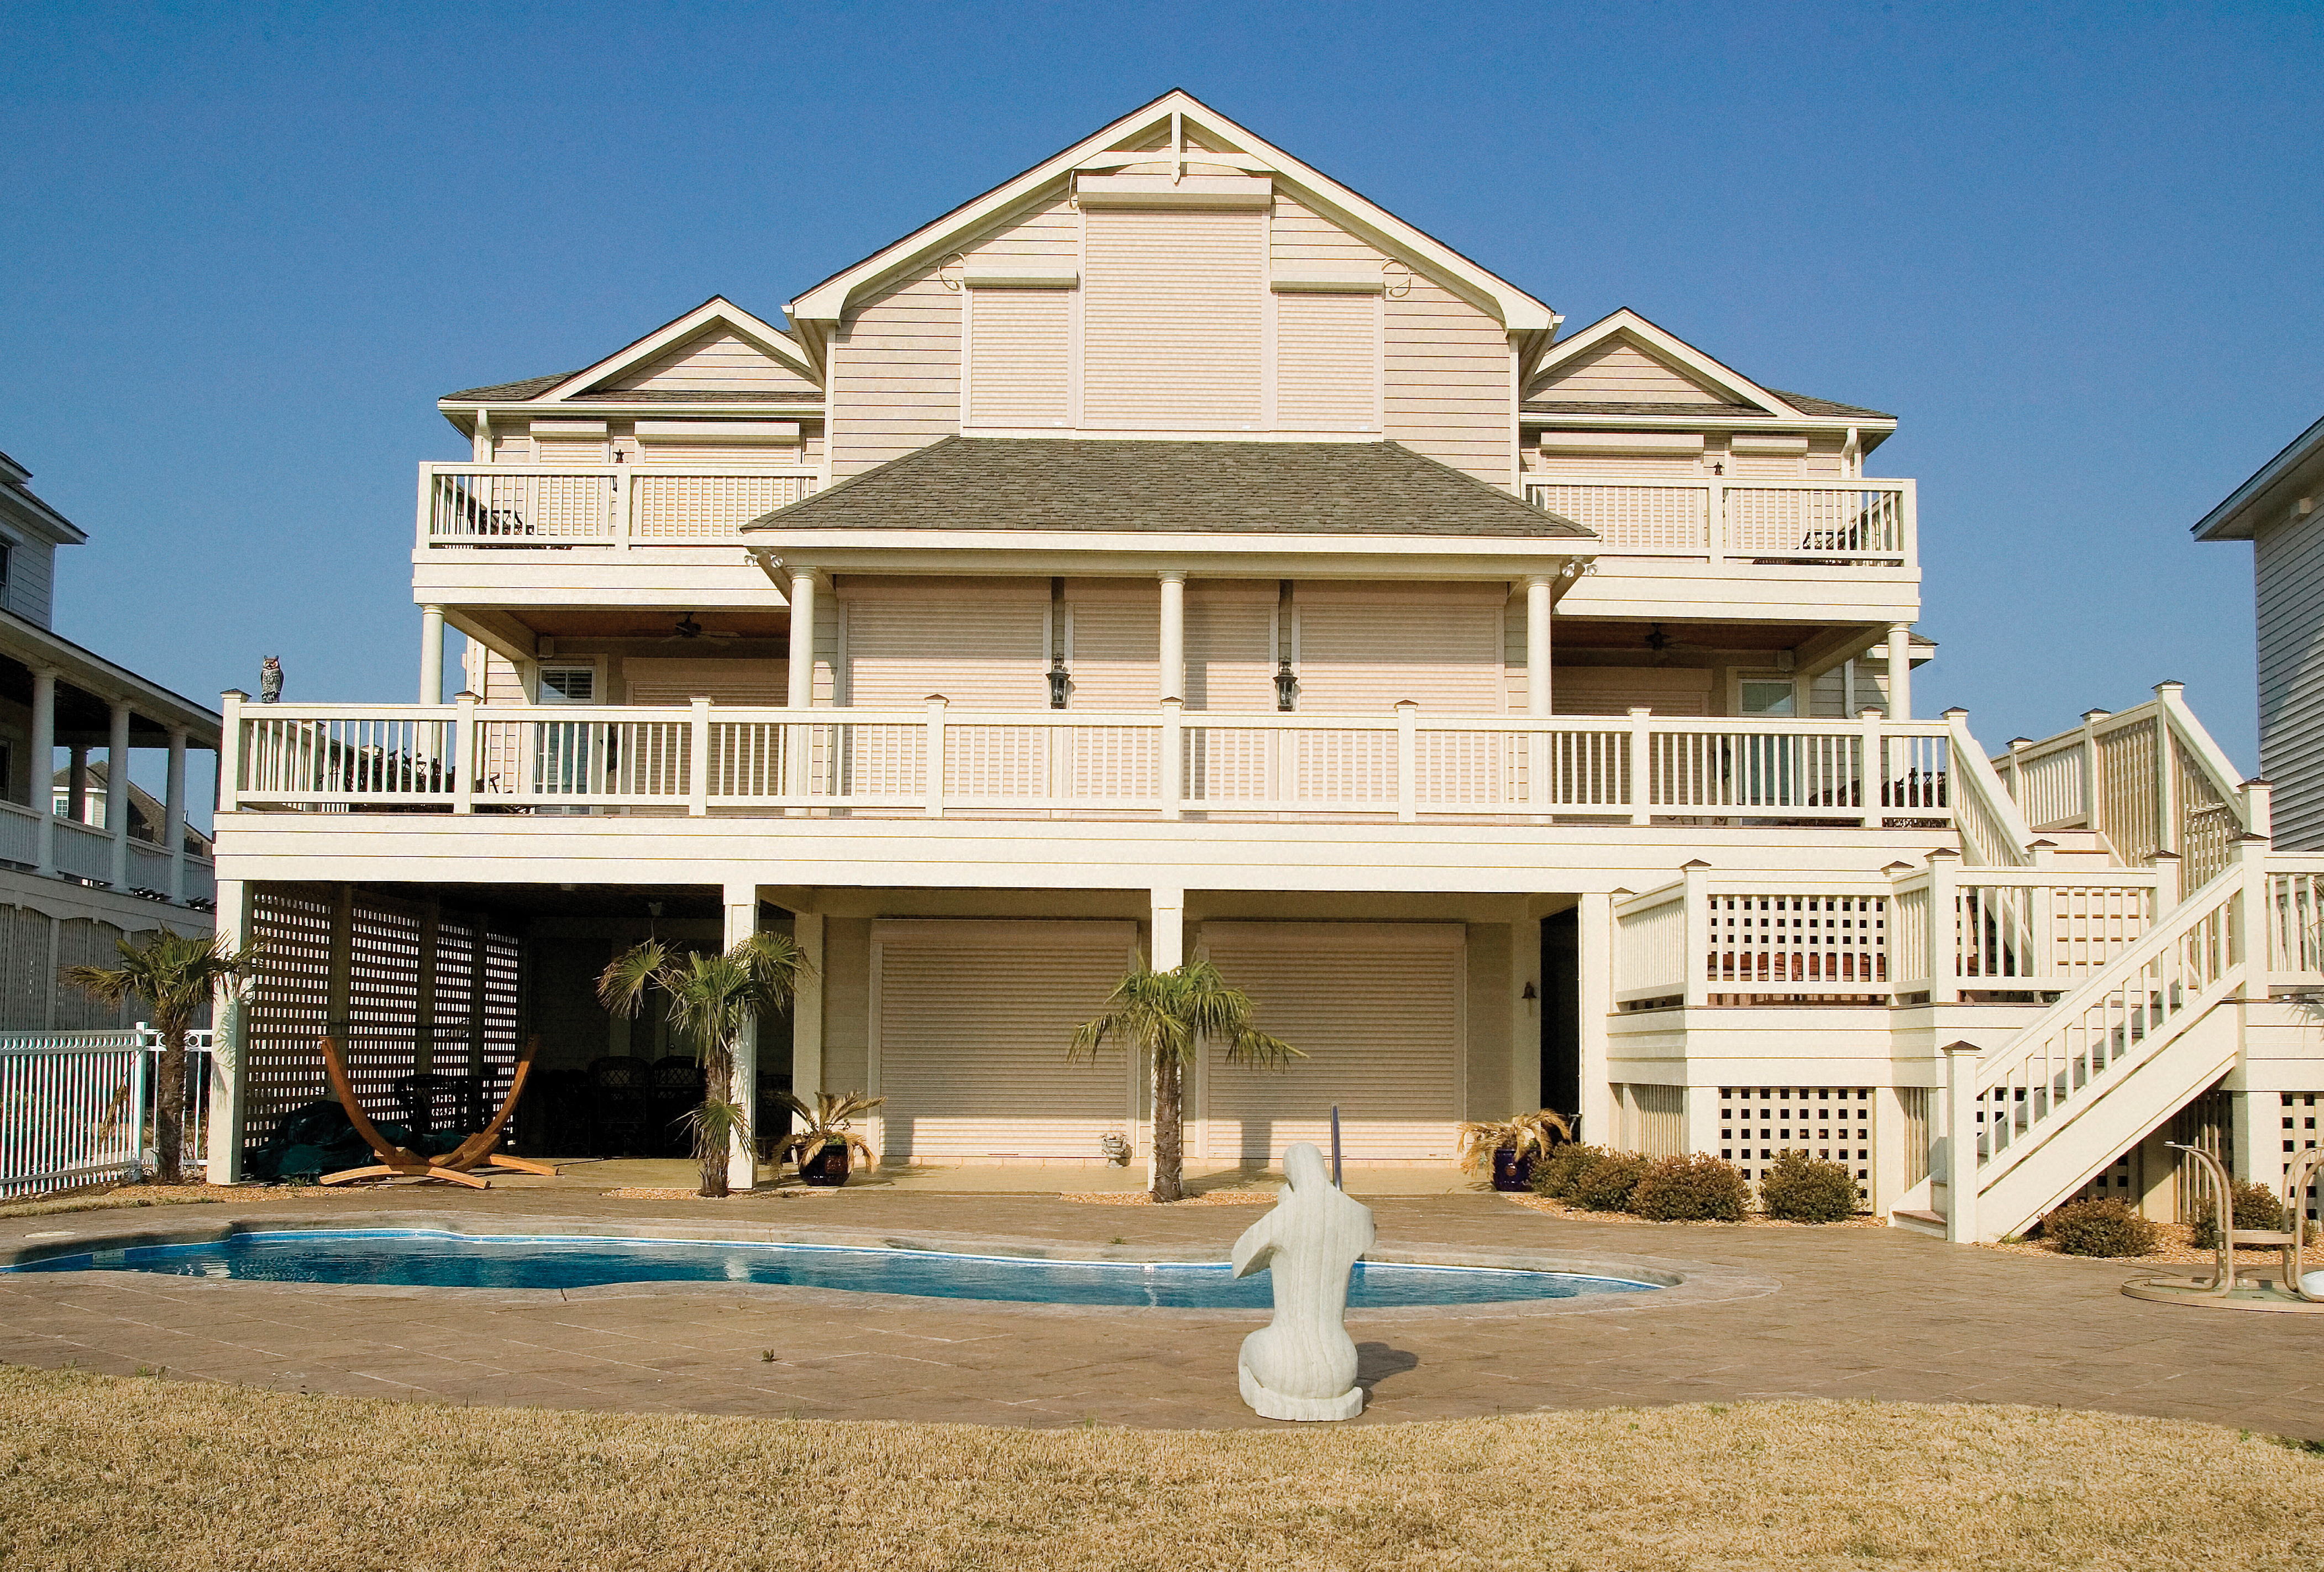
Figure 4-8. Coastal home protected with roll-down shutters on all windows and doors. The shutter is held in place by vertical guide tracks and can be deployed manually or with an integrated electric motor.
Source: Roll-a-way/QMI.
Since roll-down shutters are easily deployed, these often are used on a regular (non-storm) basis for light control, insulation against heat and noise, or for privacy and security. The variety of features and methods of operation lead to a wide range of costs for this shutter type.
Accordion Shutters
One of the most commonly used shutter types in hurricane-prone regions is the accordion shutter (Figure 4-9). This is a permanently installed system with interconnected “blades” that operate between horizontal tracks. When not in use, the blades fold and are stored on either side of the door or window being protected. Accordion shutters are manually deployed and can be deployed from the inside of the home, if the opening is a single- or double-hung window or an in-swinging window or door.
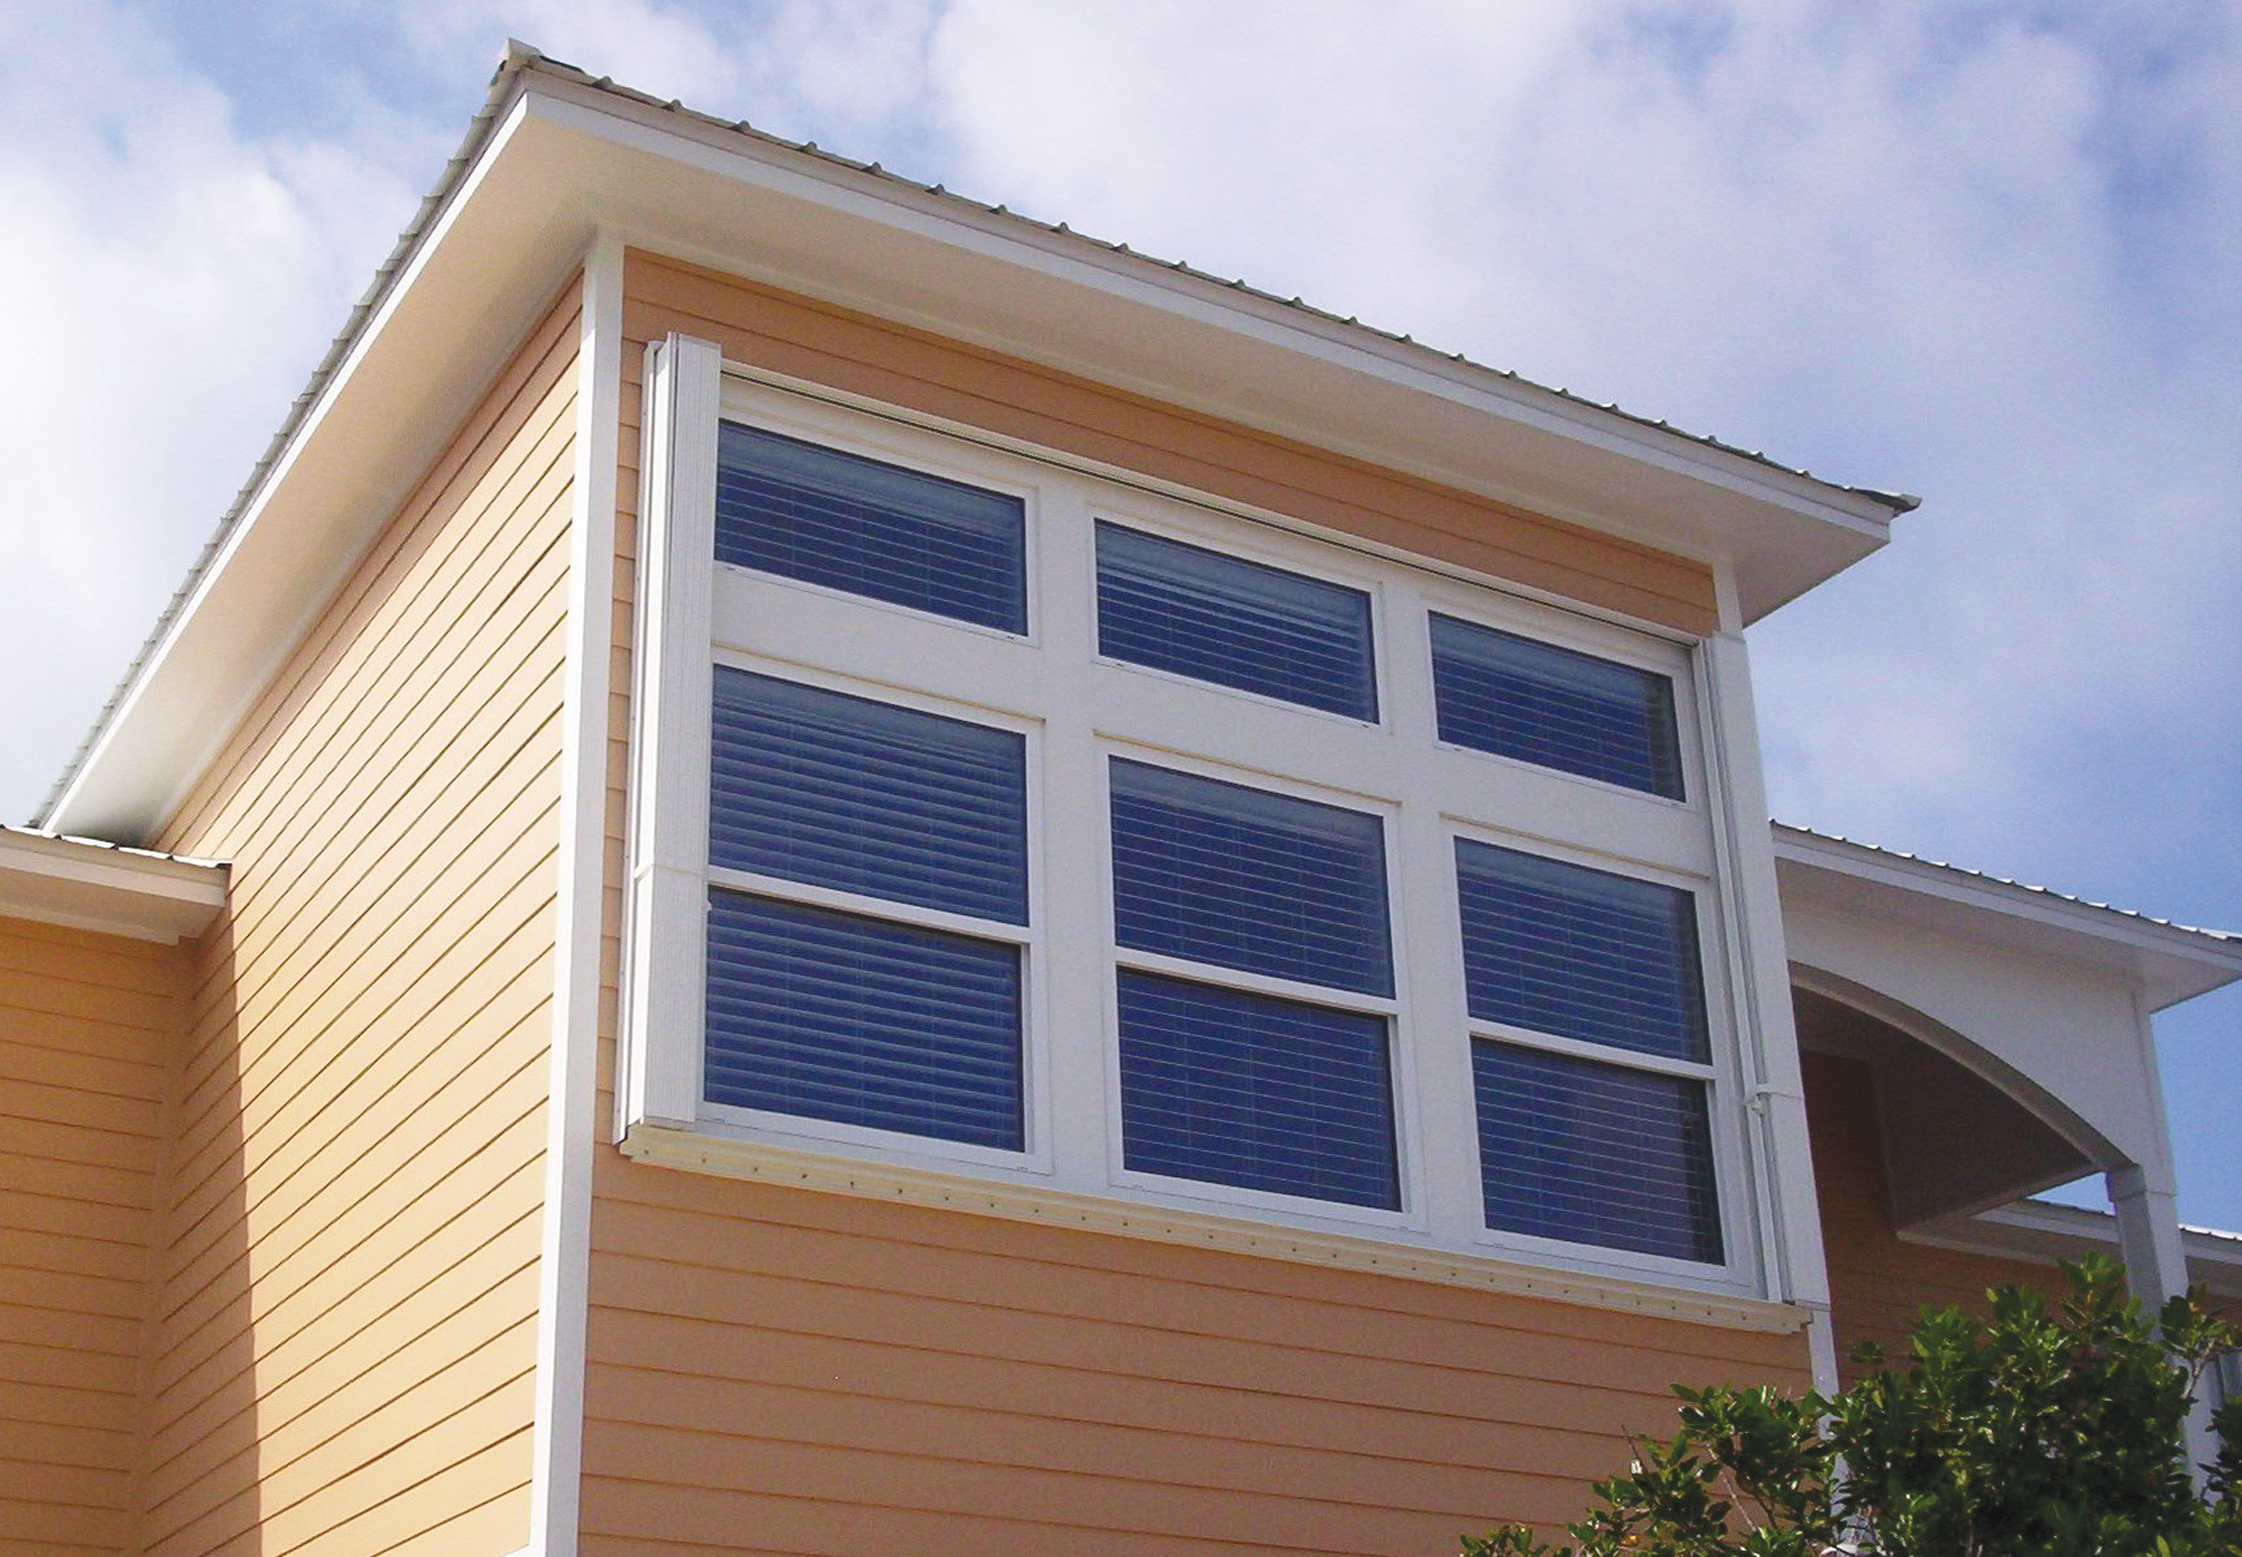
Figure 4-9. Accordion shutter (shown in open position) installed over a large window group of a coastal home. Shutter has been installed to allow deployment from inside the home.
Source: Roll-a-way/QMI.
Decorative/Protective Shutters
For homeowners who wish to add a decorative flair to their home’s exterior, Bahama or Bermuda and colonial-type shutters are available for window protection (Figures 4-10 and 4-11). These are most commonly made using extruded aluminum frames and louvers, although some composite materials are also used. Typically, these are finished using a durable exterior-grade powder coating or automotive-grade polyurethane paint system. However, it should be noted that neither traditional wood shutters, nor these wood look-alike shutters, have been tested and approved for any category of hurricane or windspeed.
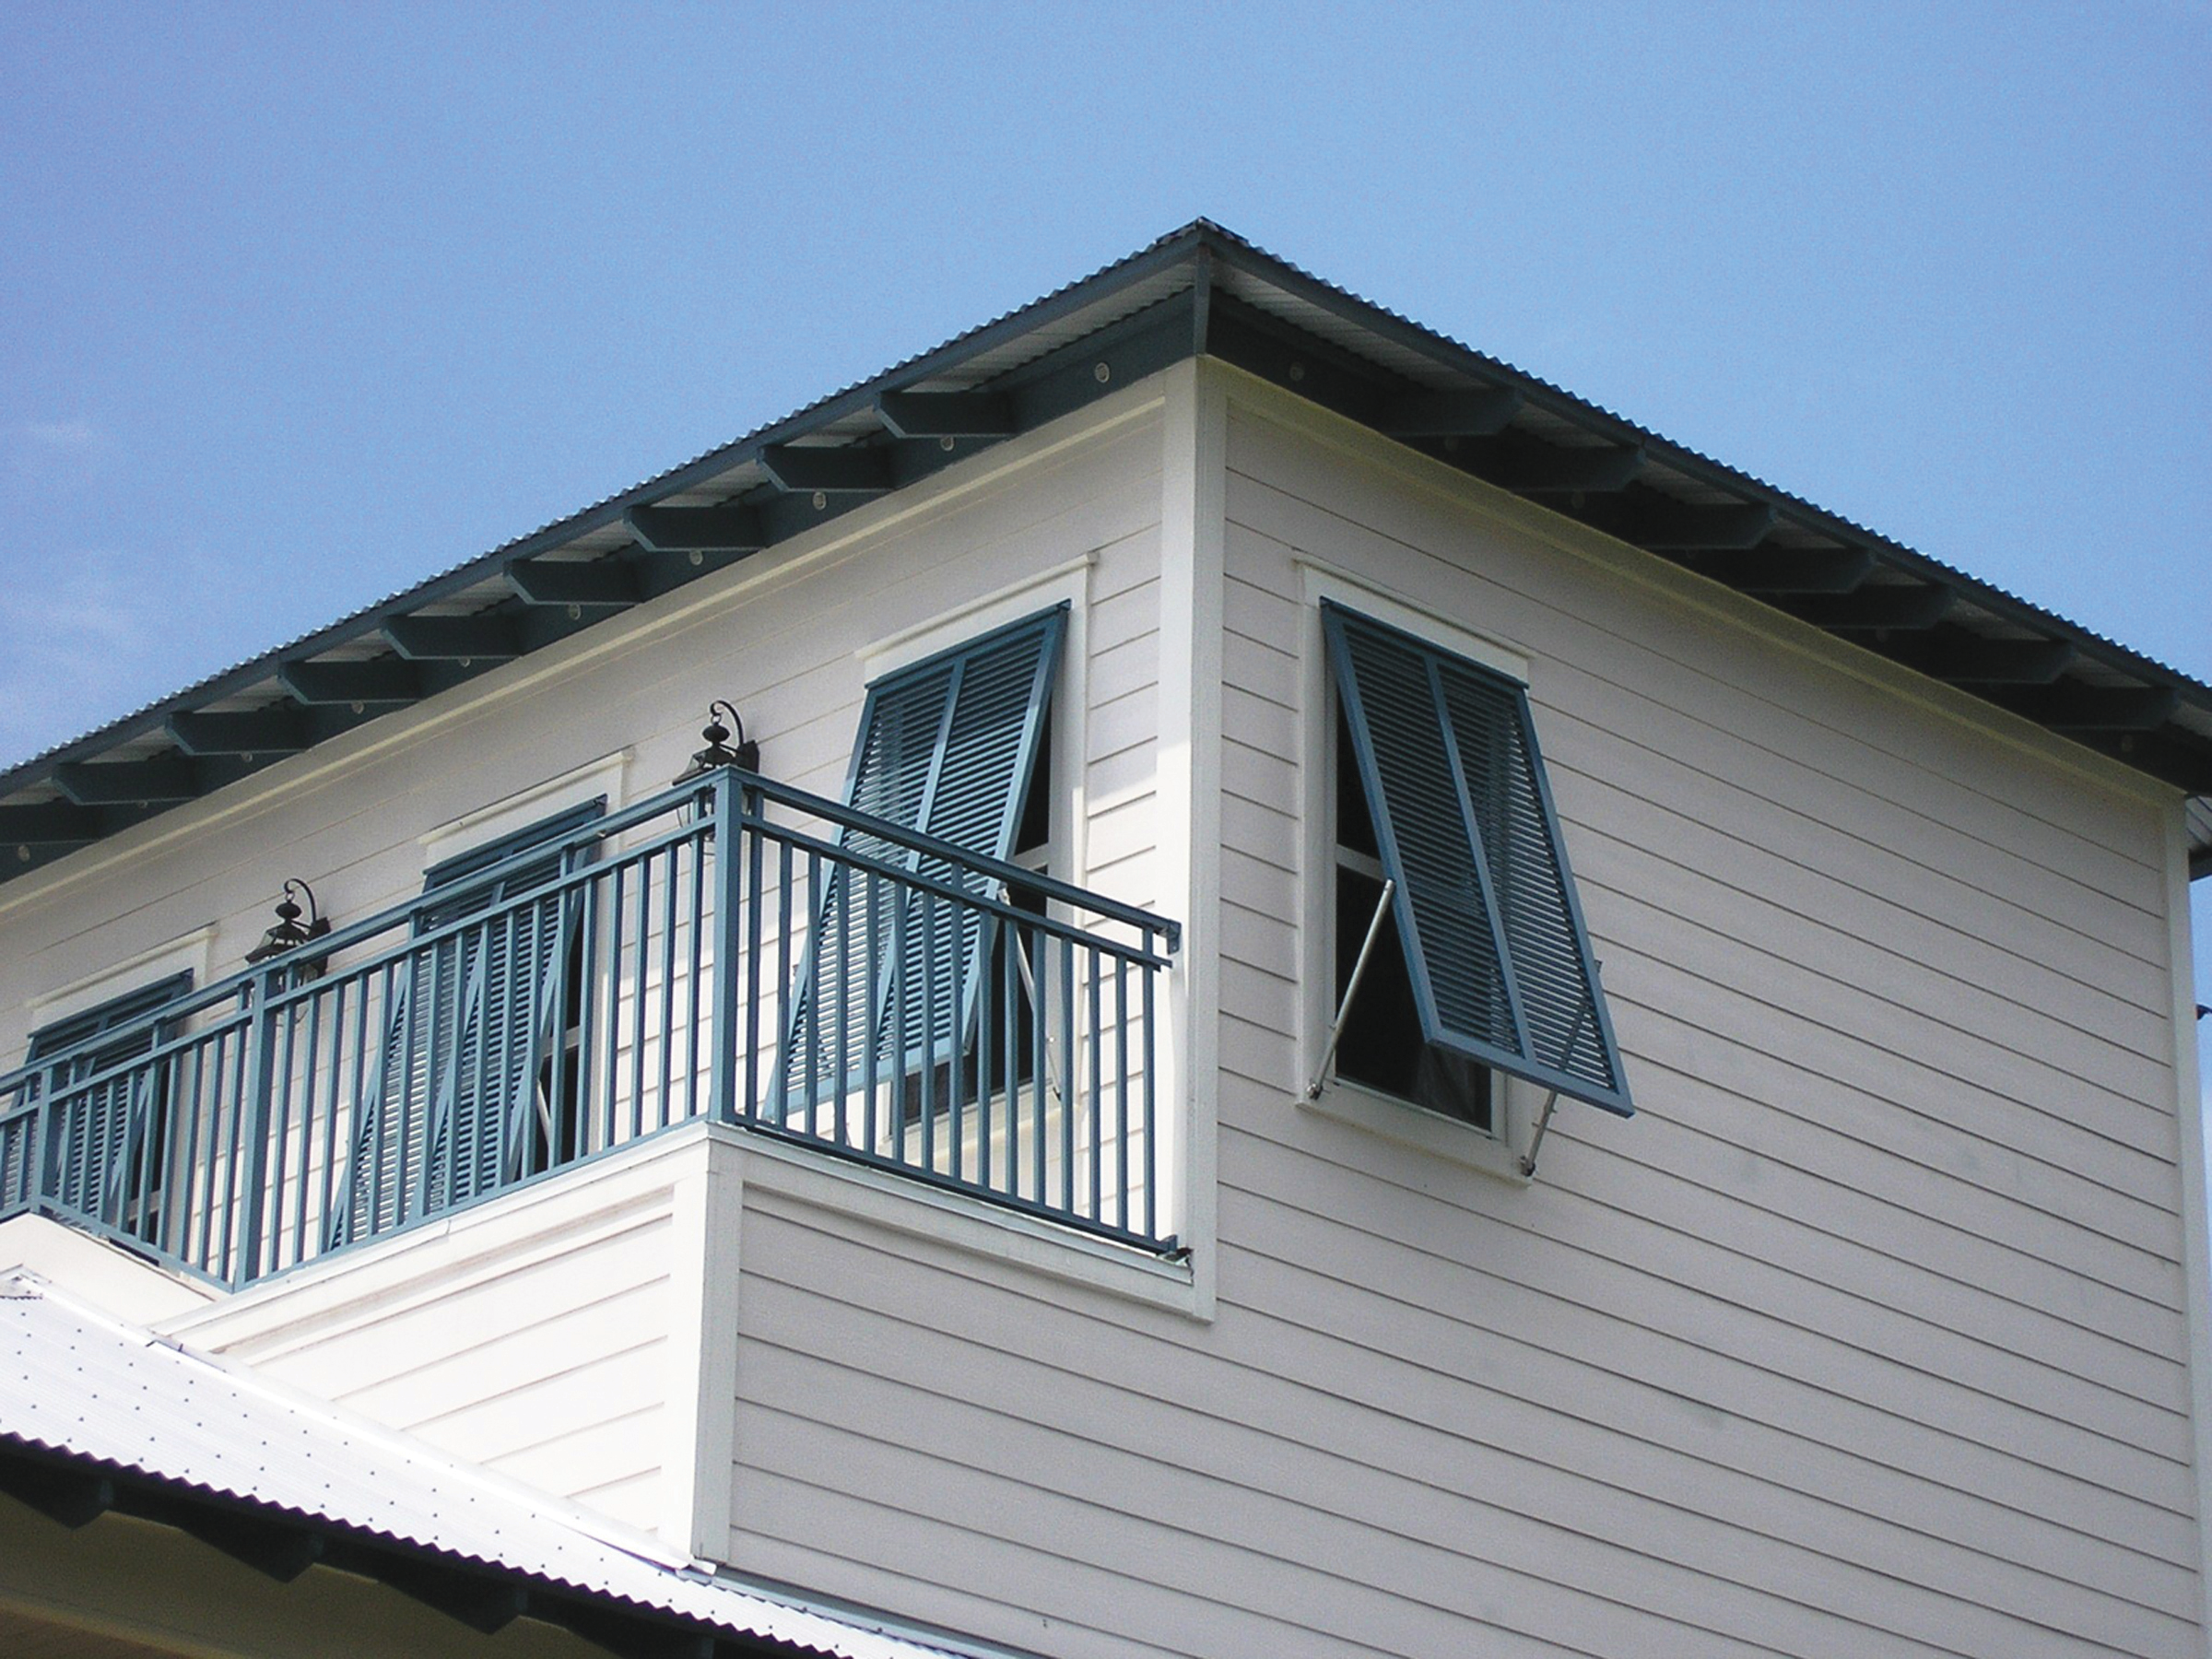
Figure 4-10. Bahama shutters made from durable extruded aluminum components add "Island" flair to a home and provide opening protection.
Source: Roll-a-way/QMI.
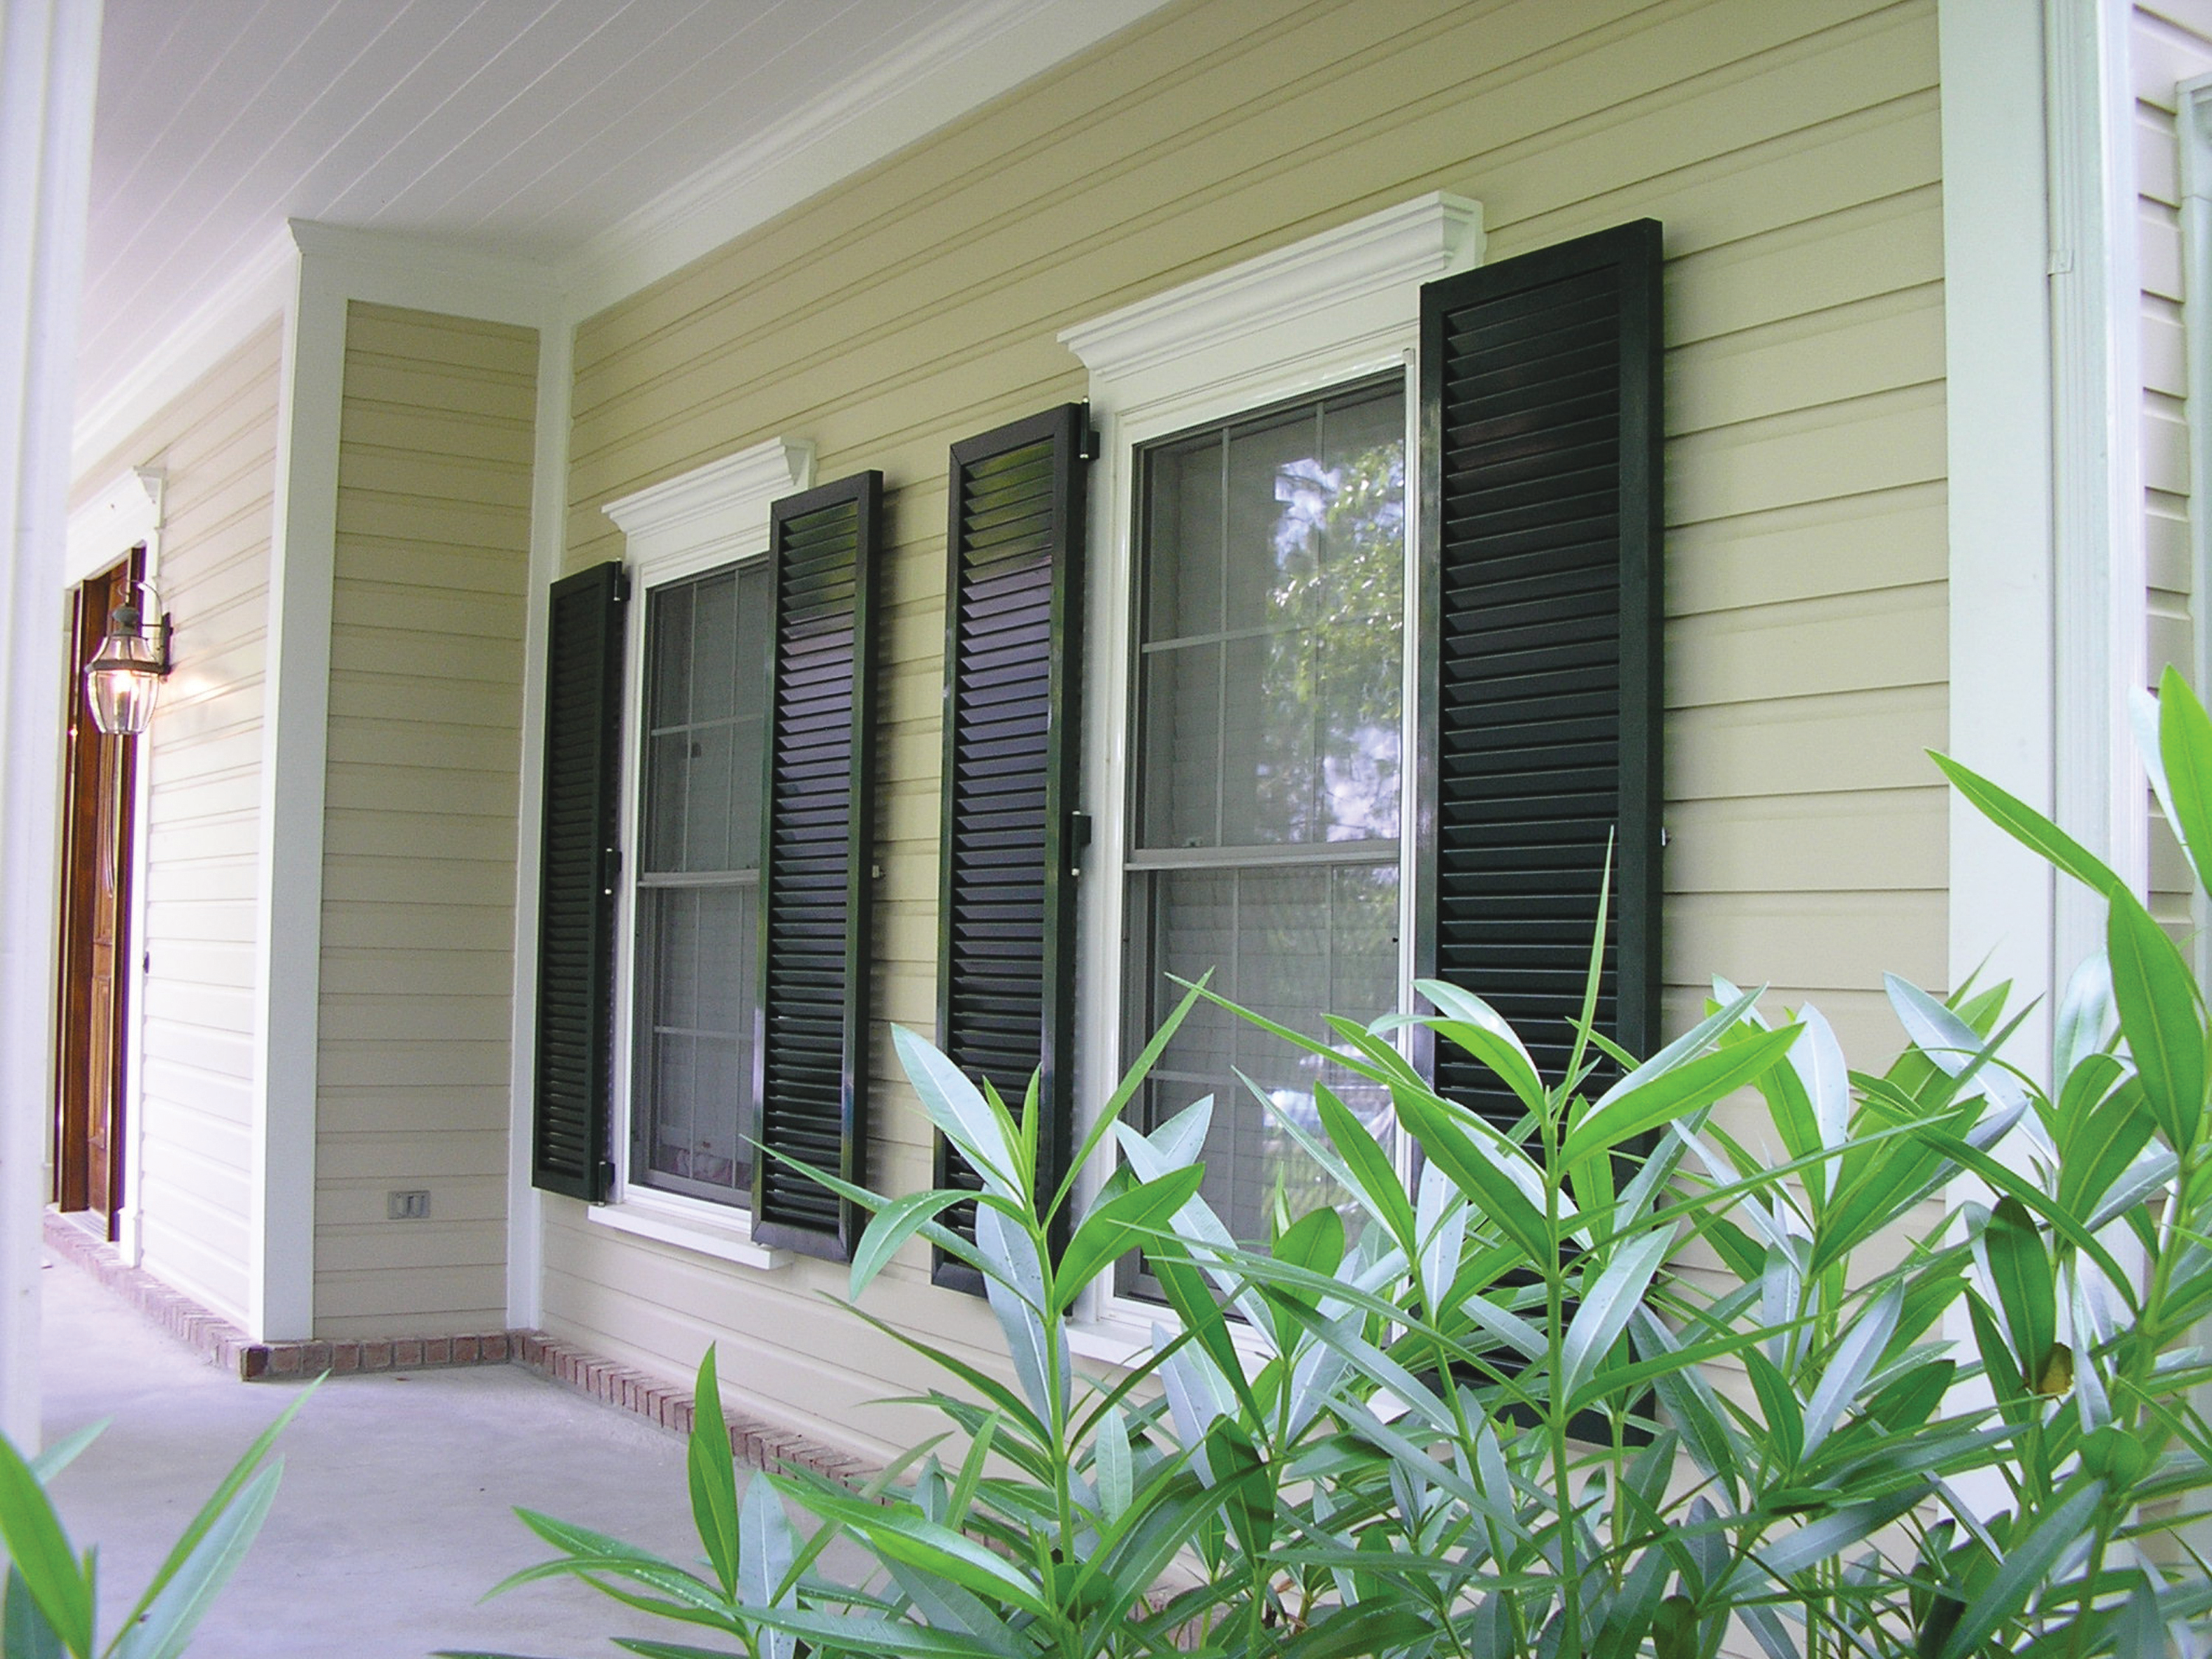
Figure 4-11. Colonial shutters made from durable extruded aluminum components add a traditional look to the home and protect window openings.
Source: Roll-a-way/QMI.
Storm Panels
Removable storm panel systems (Figures 4-12 and 4-13) are one of the most widely used and cost-effective systems available for opening protection. These consist of a series of panels, made from steel, aluminum, or impact-resistant polycarbonate.
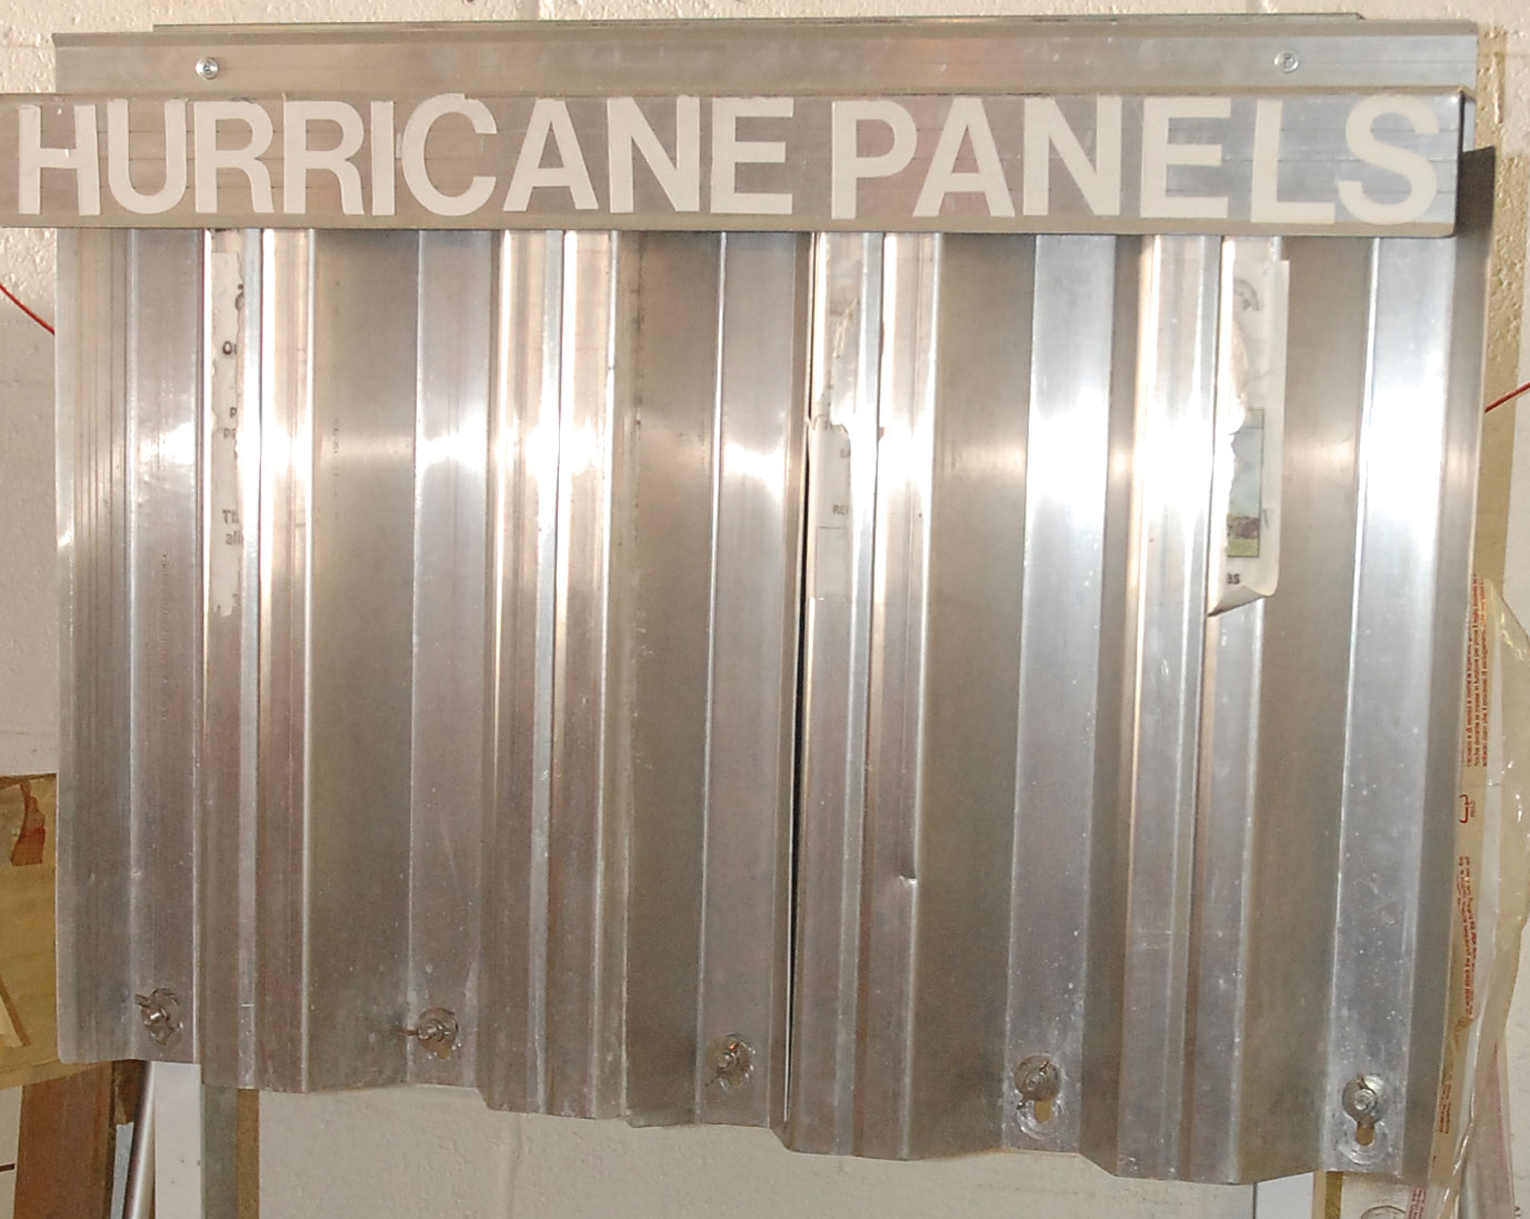
Figure 4-12. Although installation varies, this example shows panels that lsip into a track above the window. The bottoms of the panels are secured by bolts that permanently attach to the window.
Source: Hurricane Secure.
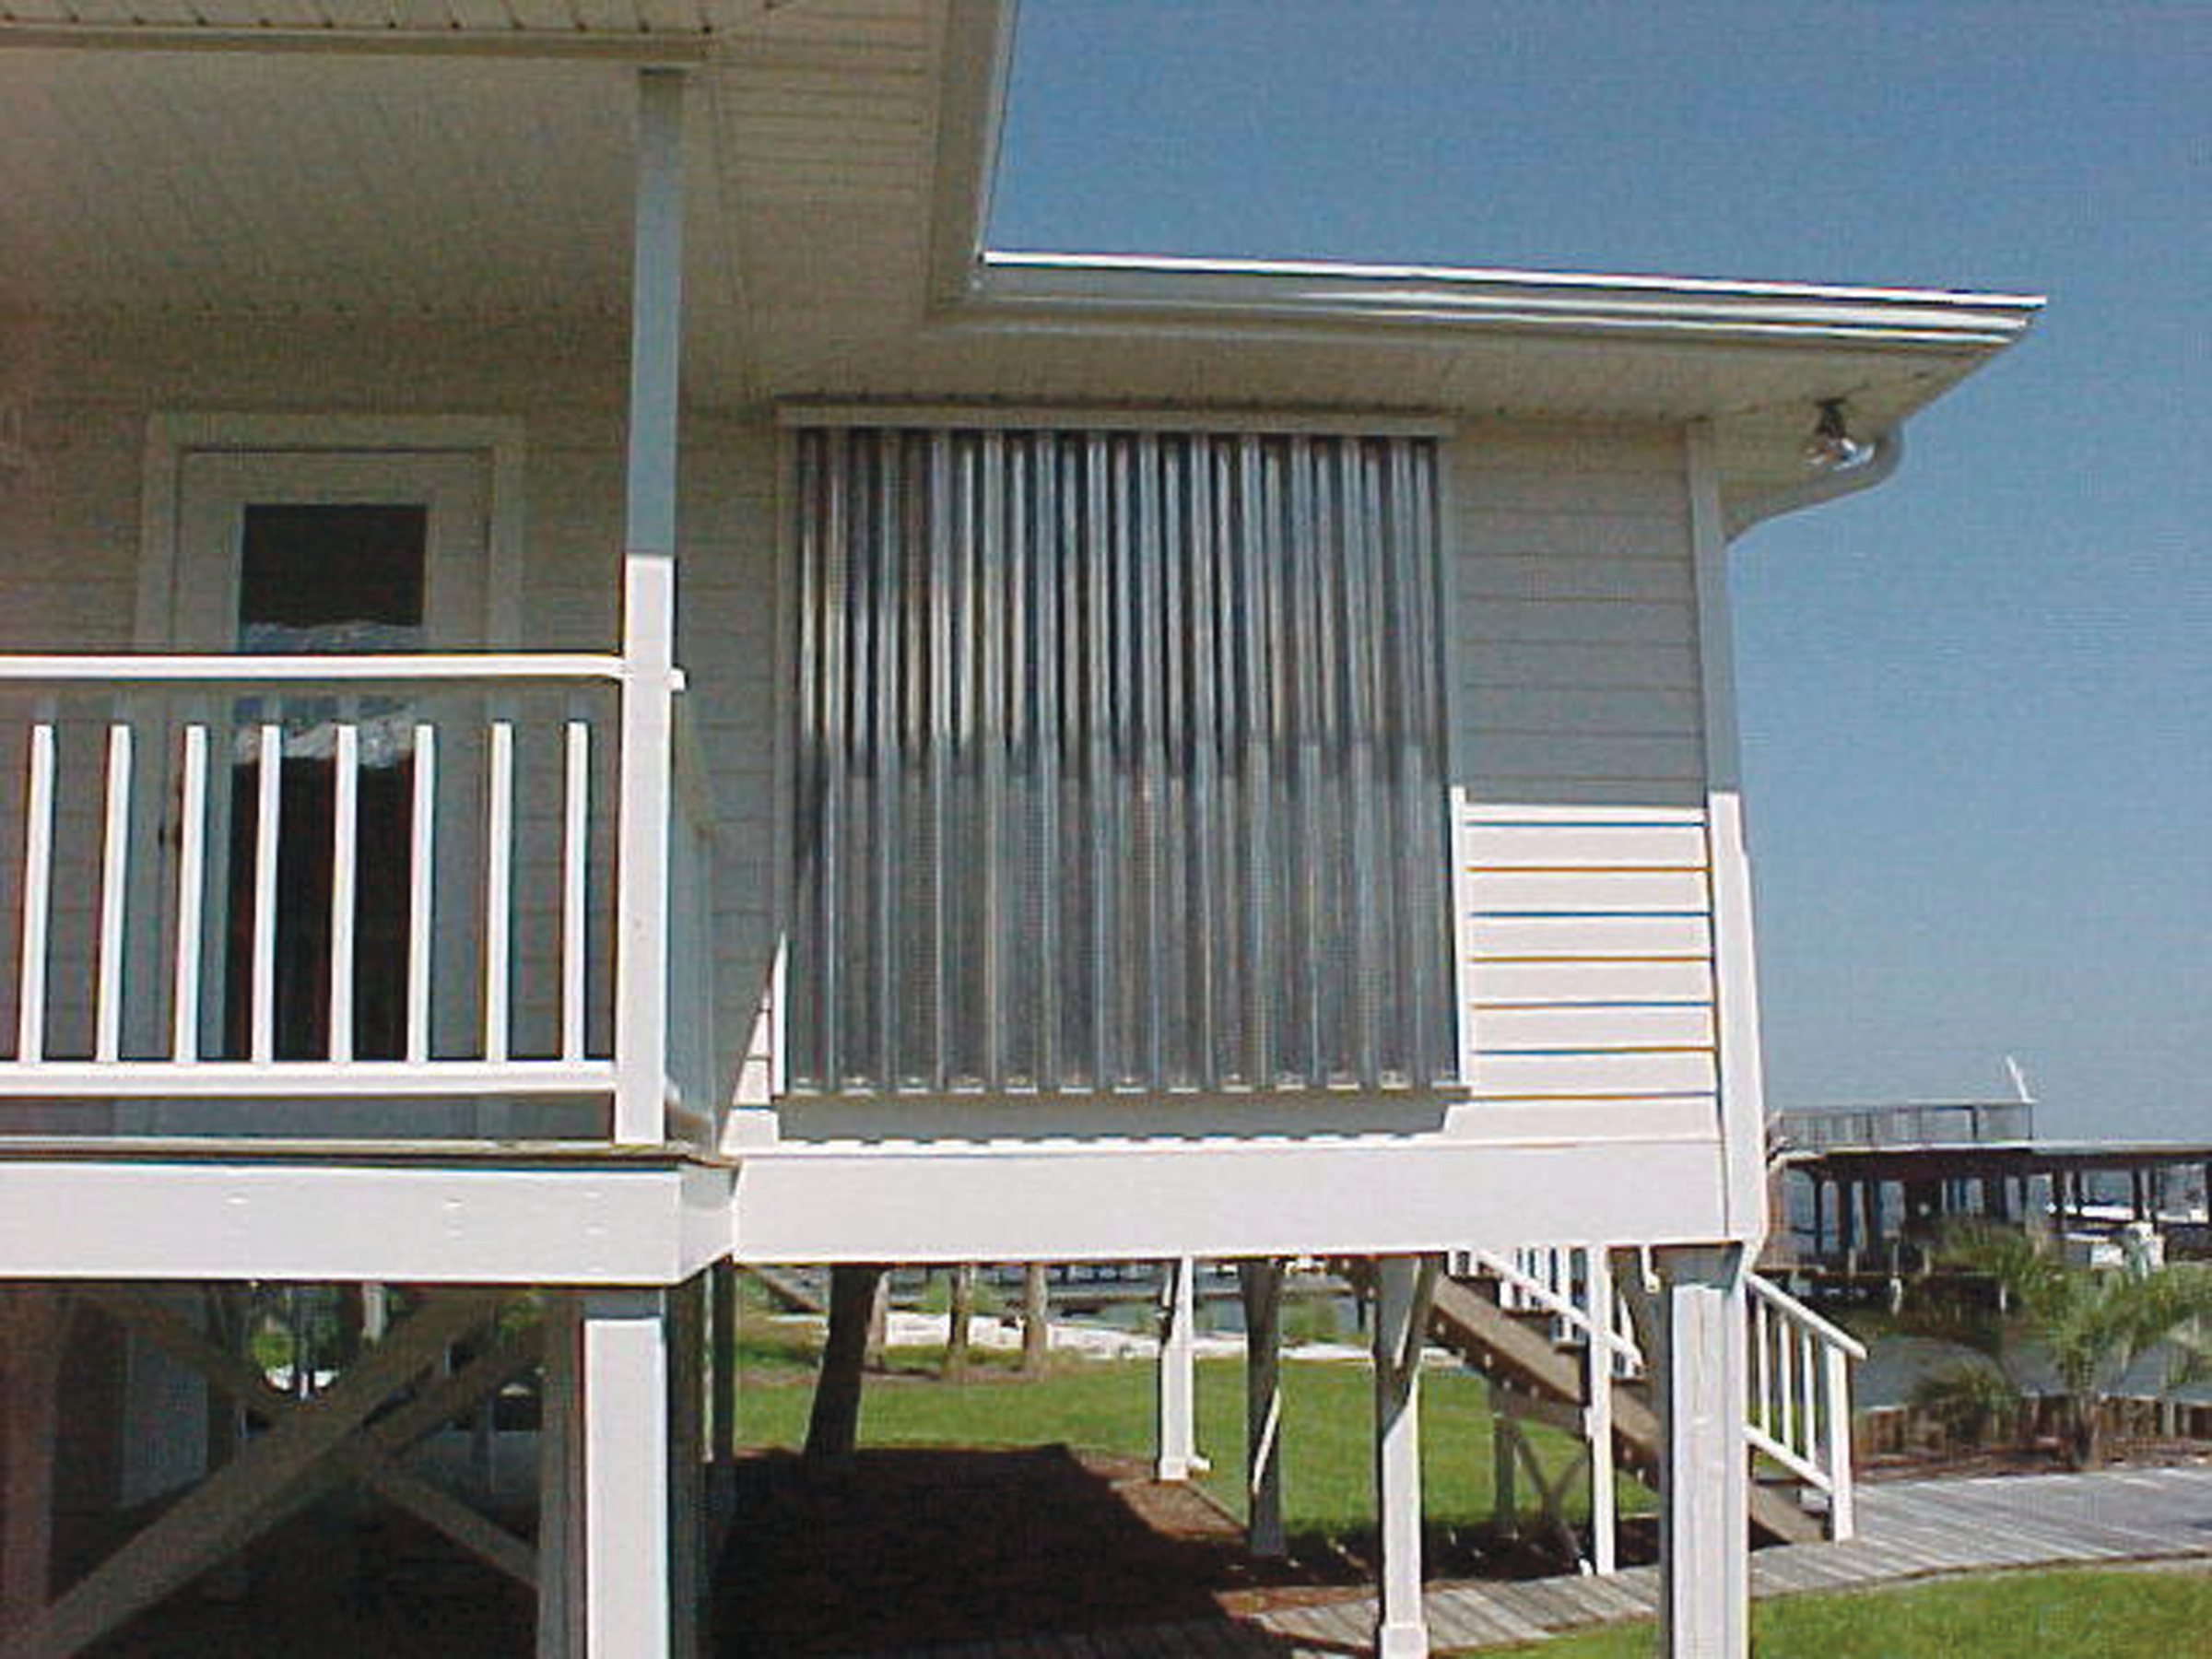
Figure 4-13. These 0.050 gauge aluminum storm panels offer cost-effective storm protection. In this example, panels slip into a track above the window and secure onto a bottom track using wing nuts.
Source: Roll-a-way/QMI.
When not in use, panels are stackable for convenient storage. Wide varieties of track options are possible. While these systems are relatively inexpensive, they require much more effort for the homeowner to deploy than the other types mentioned above.
In-Place Systems
Requiring no advance deployment, impact-resistant systems that are permanently installed on a structure can be an attractive option for opening protection. Two types currently on the market are 1) impact-resistant stainless steel screen units, and 2) installed flat impact polycarbonate. Both of these have little, if any, negative aesthetic impact on the home.
Impact-resistant stainless steel screen systems (Figure 4-14) consist of a heavy-gauge stainless steel screen mesh that is secured in an extruded aluminum frame. This unit is installed over the window to be protected. These are available as operable units, which facilitates cleaning and emergency egress. Screen units also provide excellent solar shading characteristics.
Flat impact polycarbonate units (Figure 4-15) are available to protect most single and double window sizes and types found in residential homes. These are made from UV-stable optical-quality grades of polycarbonate and provide excellent protection against all storm forces. Because these systems are not operable from the inside of the home, emergency egress from the home must be considered before installing this system.
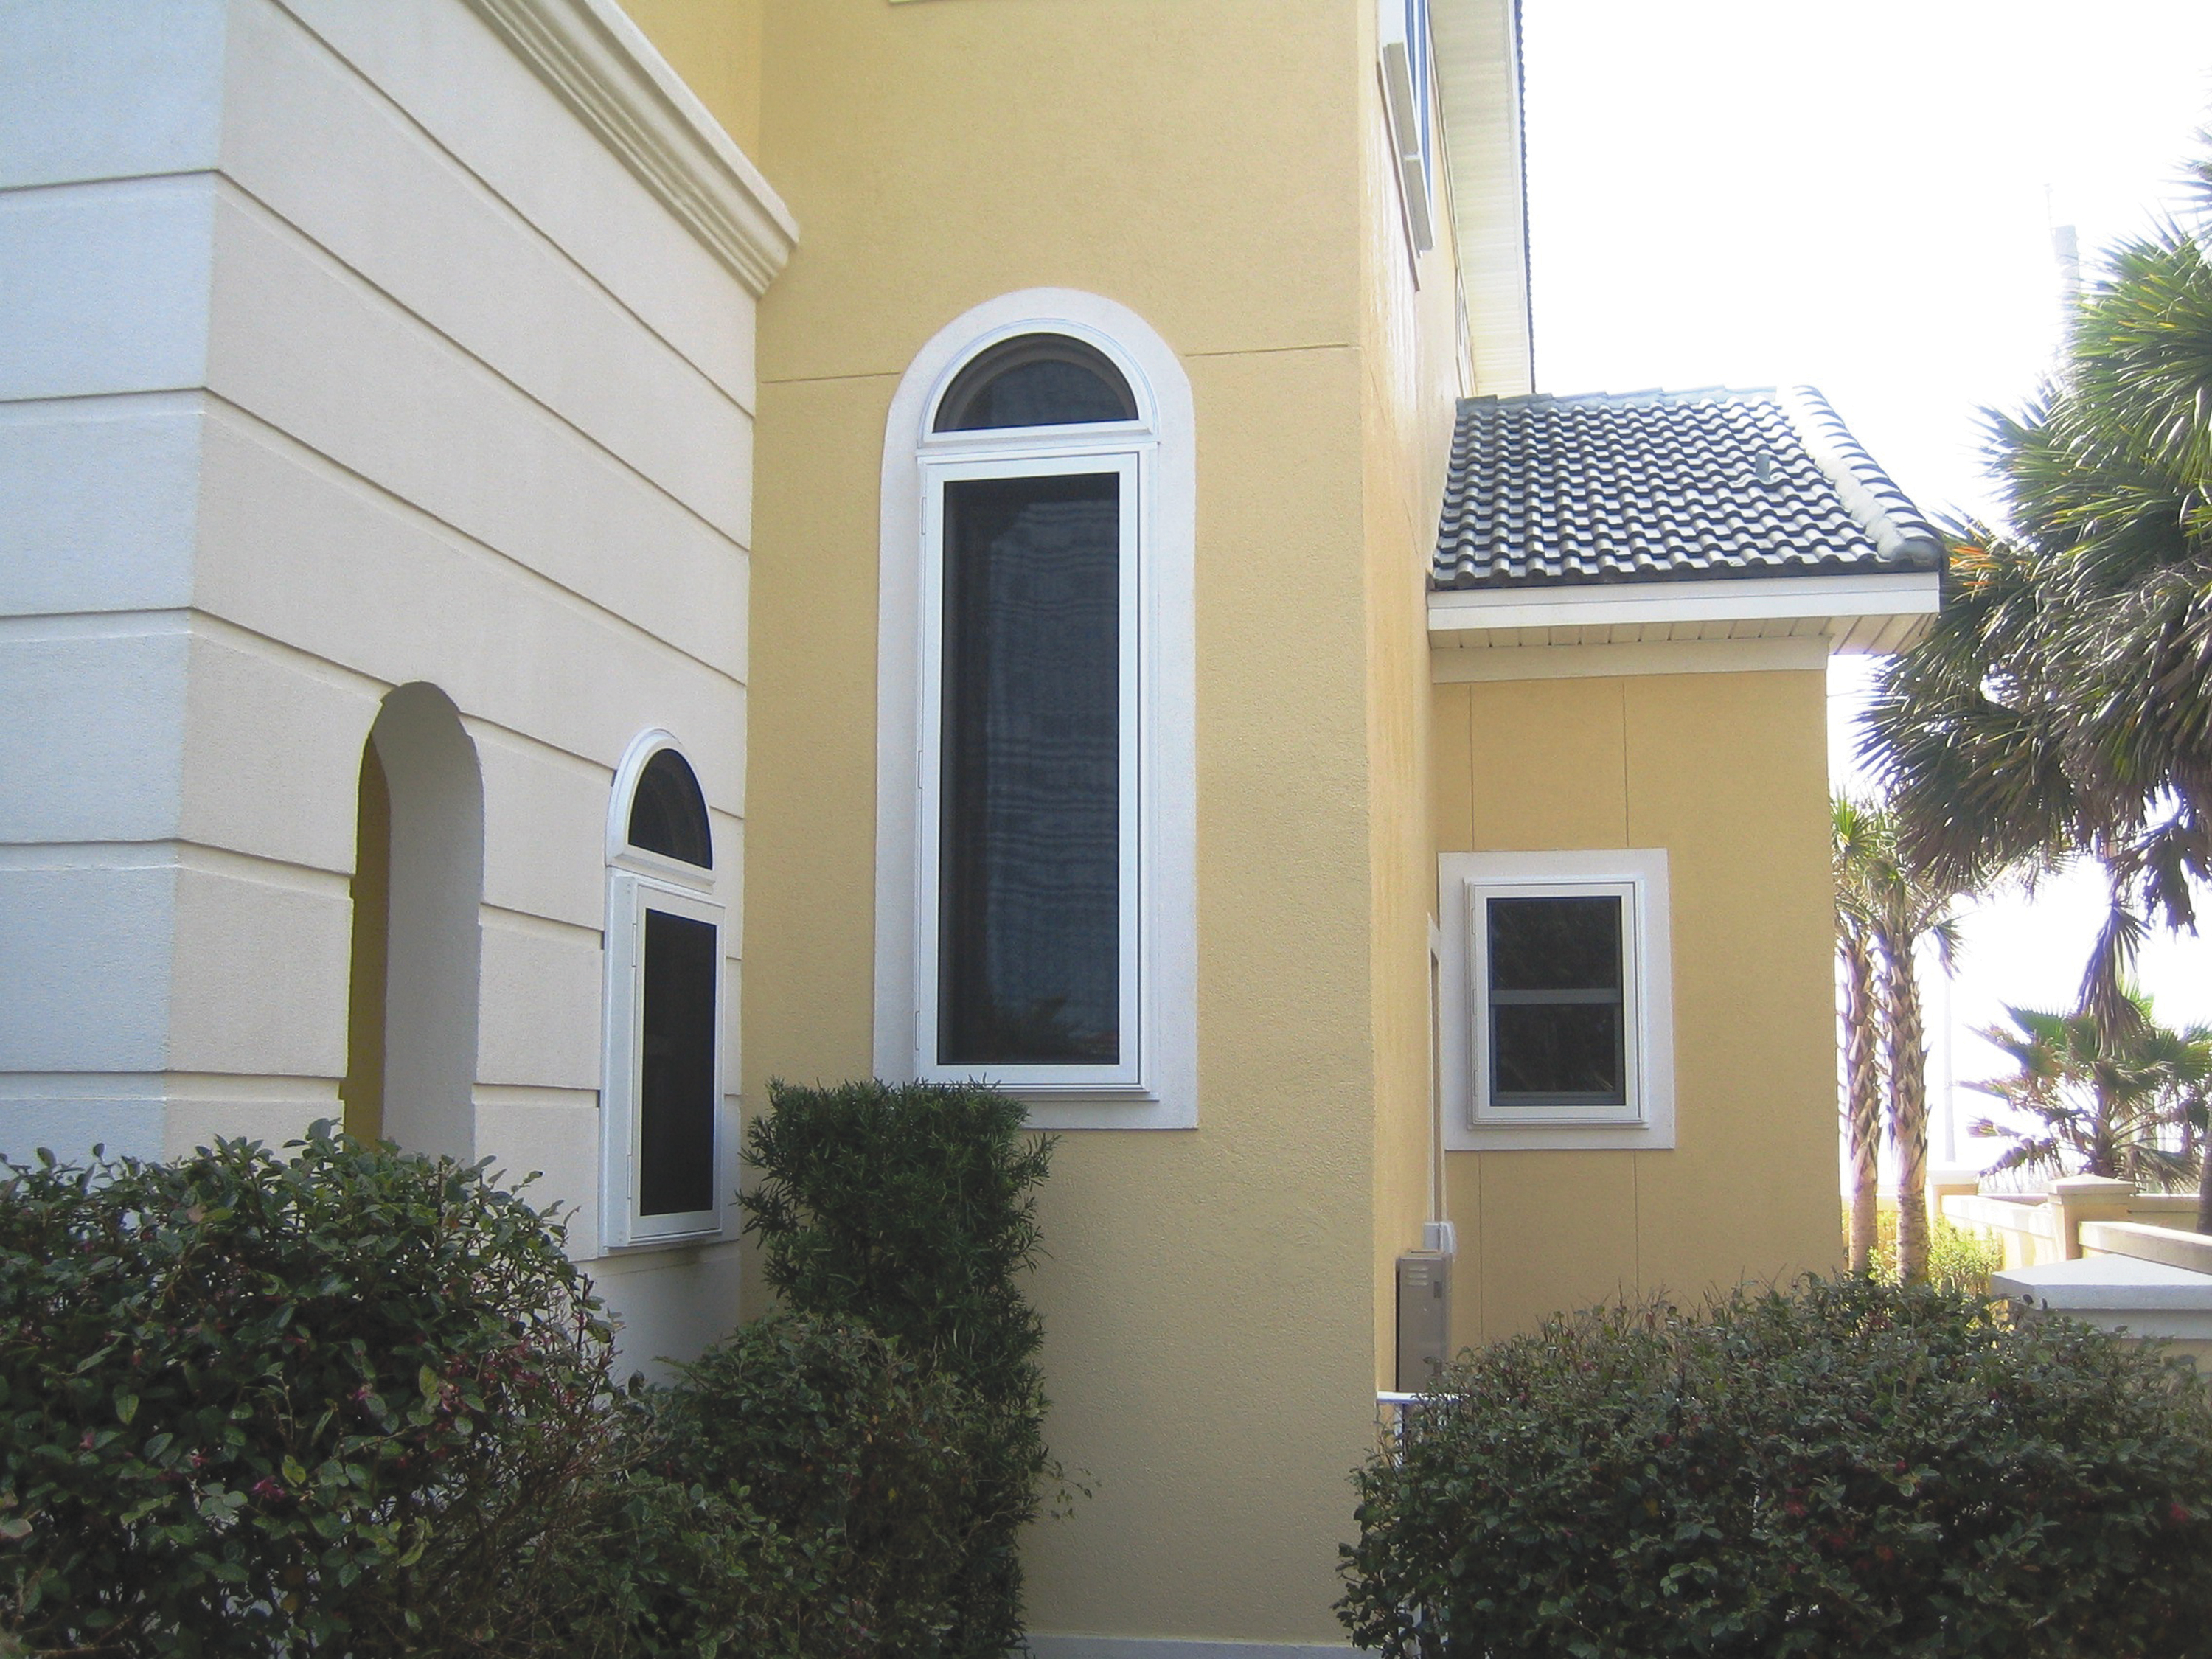
Figure 4-14. In-place stainless steel impact screen protecting several windows of a coastal residence. This system requires no deployment and provides shade.
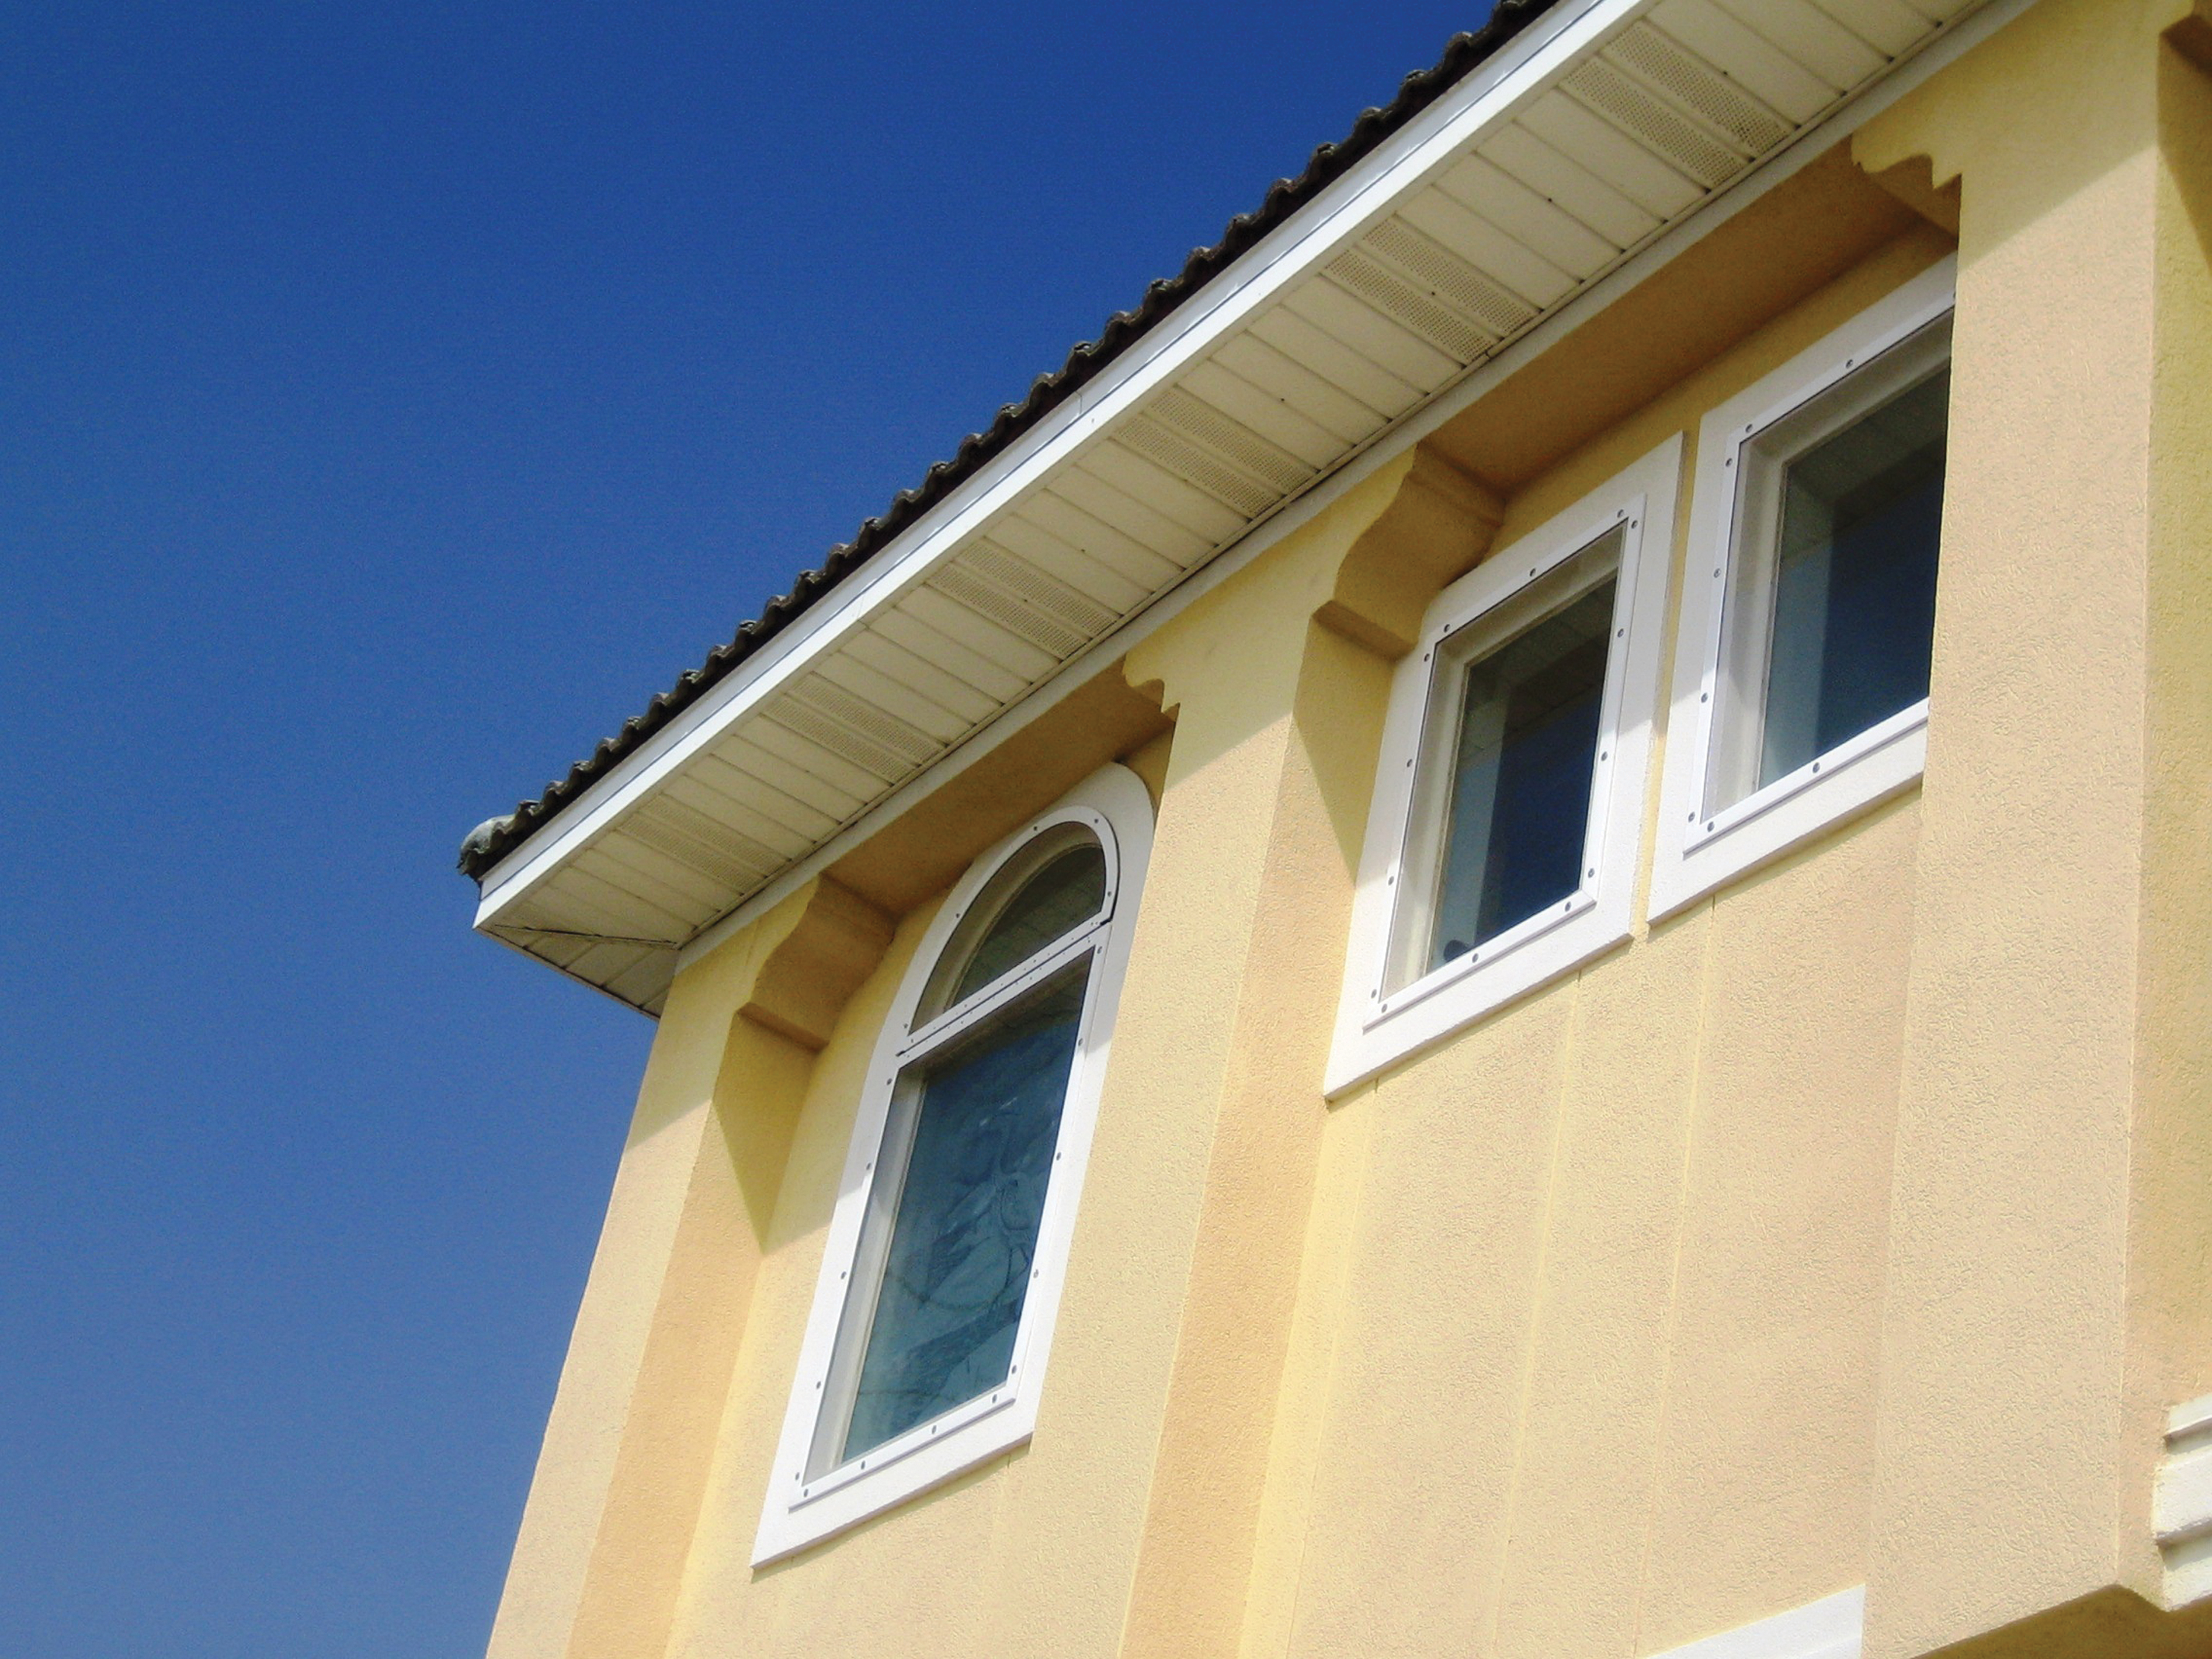
Figure 4-15. Flat impact polycarbonate panels are installed directly over windows of a coastal home. This window covering provides excellent storm protection with minimal aesthetic impact.
Source: Roll-a-way/QMI.
Fabric Windscreen
Impact-resistant fabric panels made from high-tensile-strength geosynthetic fibers such as polyethylene or from reinforced polyvinyl chloride (PVC) have become increasingly popular for use as window and door protection. These systems are attached on two opposite sides of the window or door, usually to permanently installed panel mates or tracks with mounting studs. The panels include integrated grommets, which facilitate the deployment of the windscreens. These systems are also relatively inexpensive.
The polyethylene fabric types, which are basket-weave systems, allow some light and visibility through the deployed screens. Some models incorporate emergency egress zippers. The PVC types are somewhat translucent, allowing light in the dwelling, but do not allow visibility through the screen.
The geosynthetic screens have also been extensively employed to enclose large, even irregularly shaped openings (Figure 4-16). Because of the installation requirements of such systems, site-specific engineering is often required, and consultation with a contractor is recommended.
Impact-Resistant Windows and Glazed Doors
Window and door manufacturers have developed products with both sturdier frames and laminated (impact-resistant) glazing to better withstand wind forces and debris (Figure 4-17). Such systems are available in a variety of styles, options, and costs. When installing any window or door, be sure to follow the manufacturer’s installation standards.
While impact-resistant openings offer deployment-free protection, the glass can still be broken (but remains in the frame). In addition, while these products are often available to the consumer through home improvement stores, professional installation is highly recommended to ensure proper attachment of the windows to the structure.
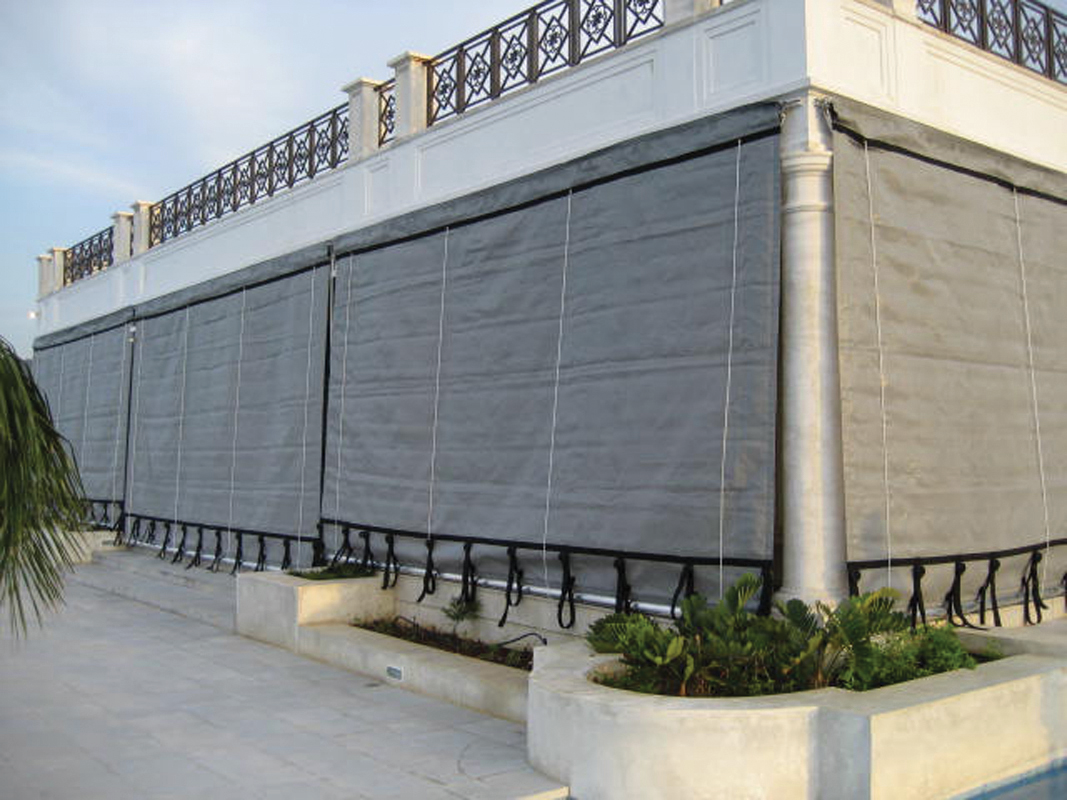
Figure 4-16. Polyethylene basket-weave fabric windscreen is deployed at the edge of a patio, enclosing the entire area.
Source: Roll-a-way/QMI.
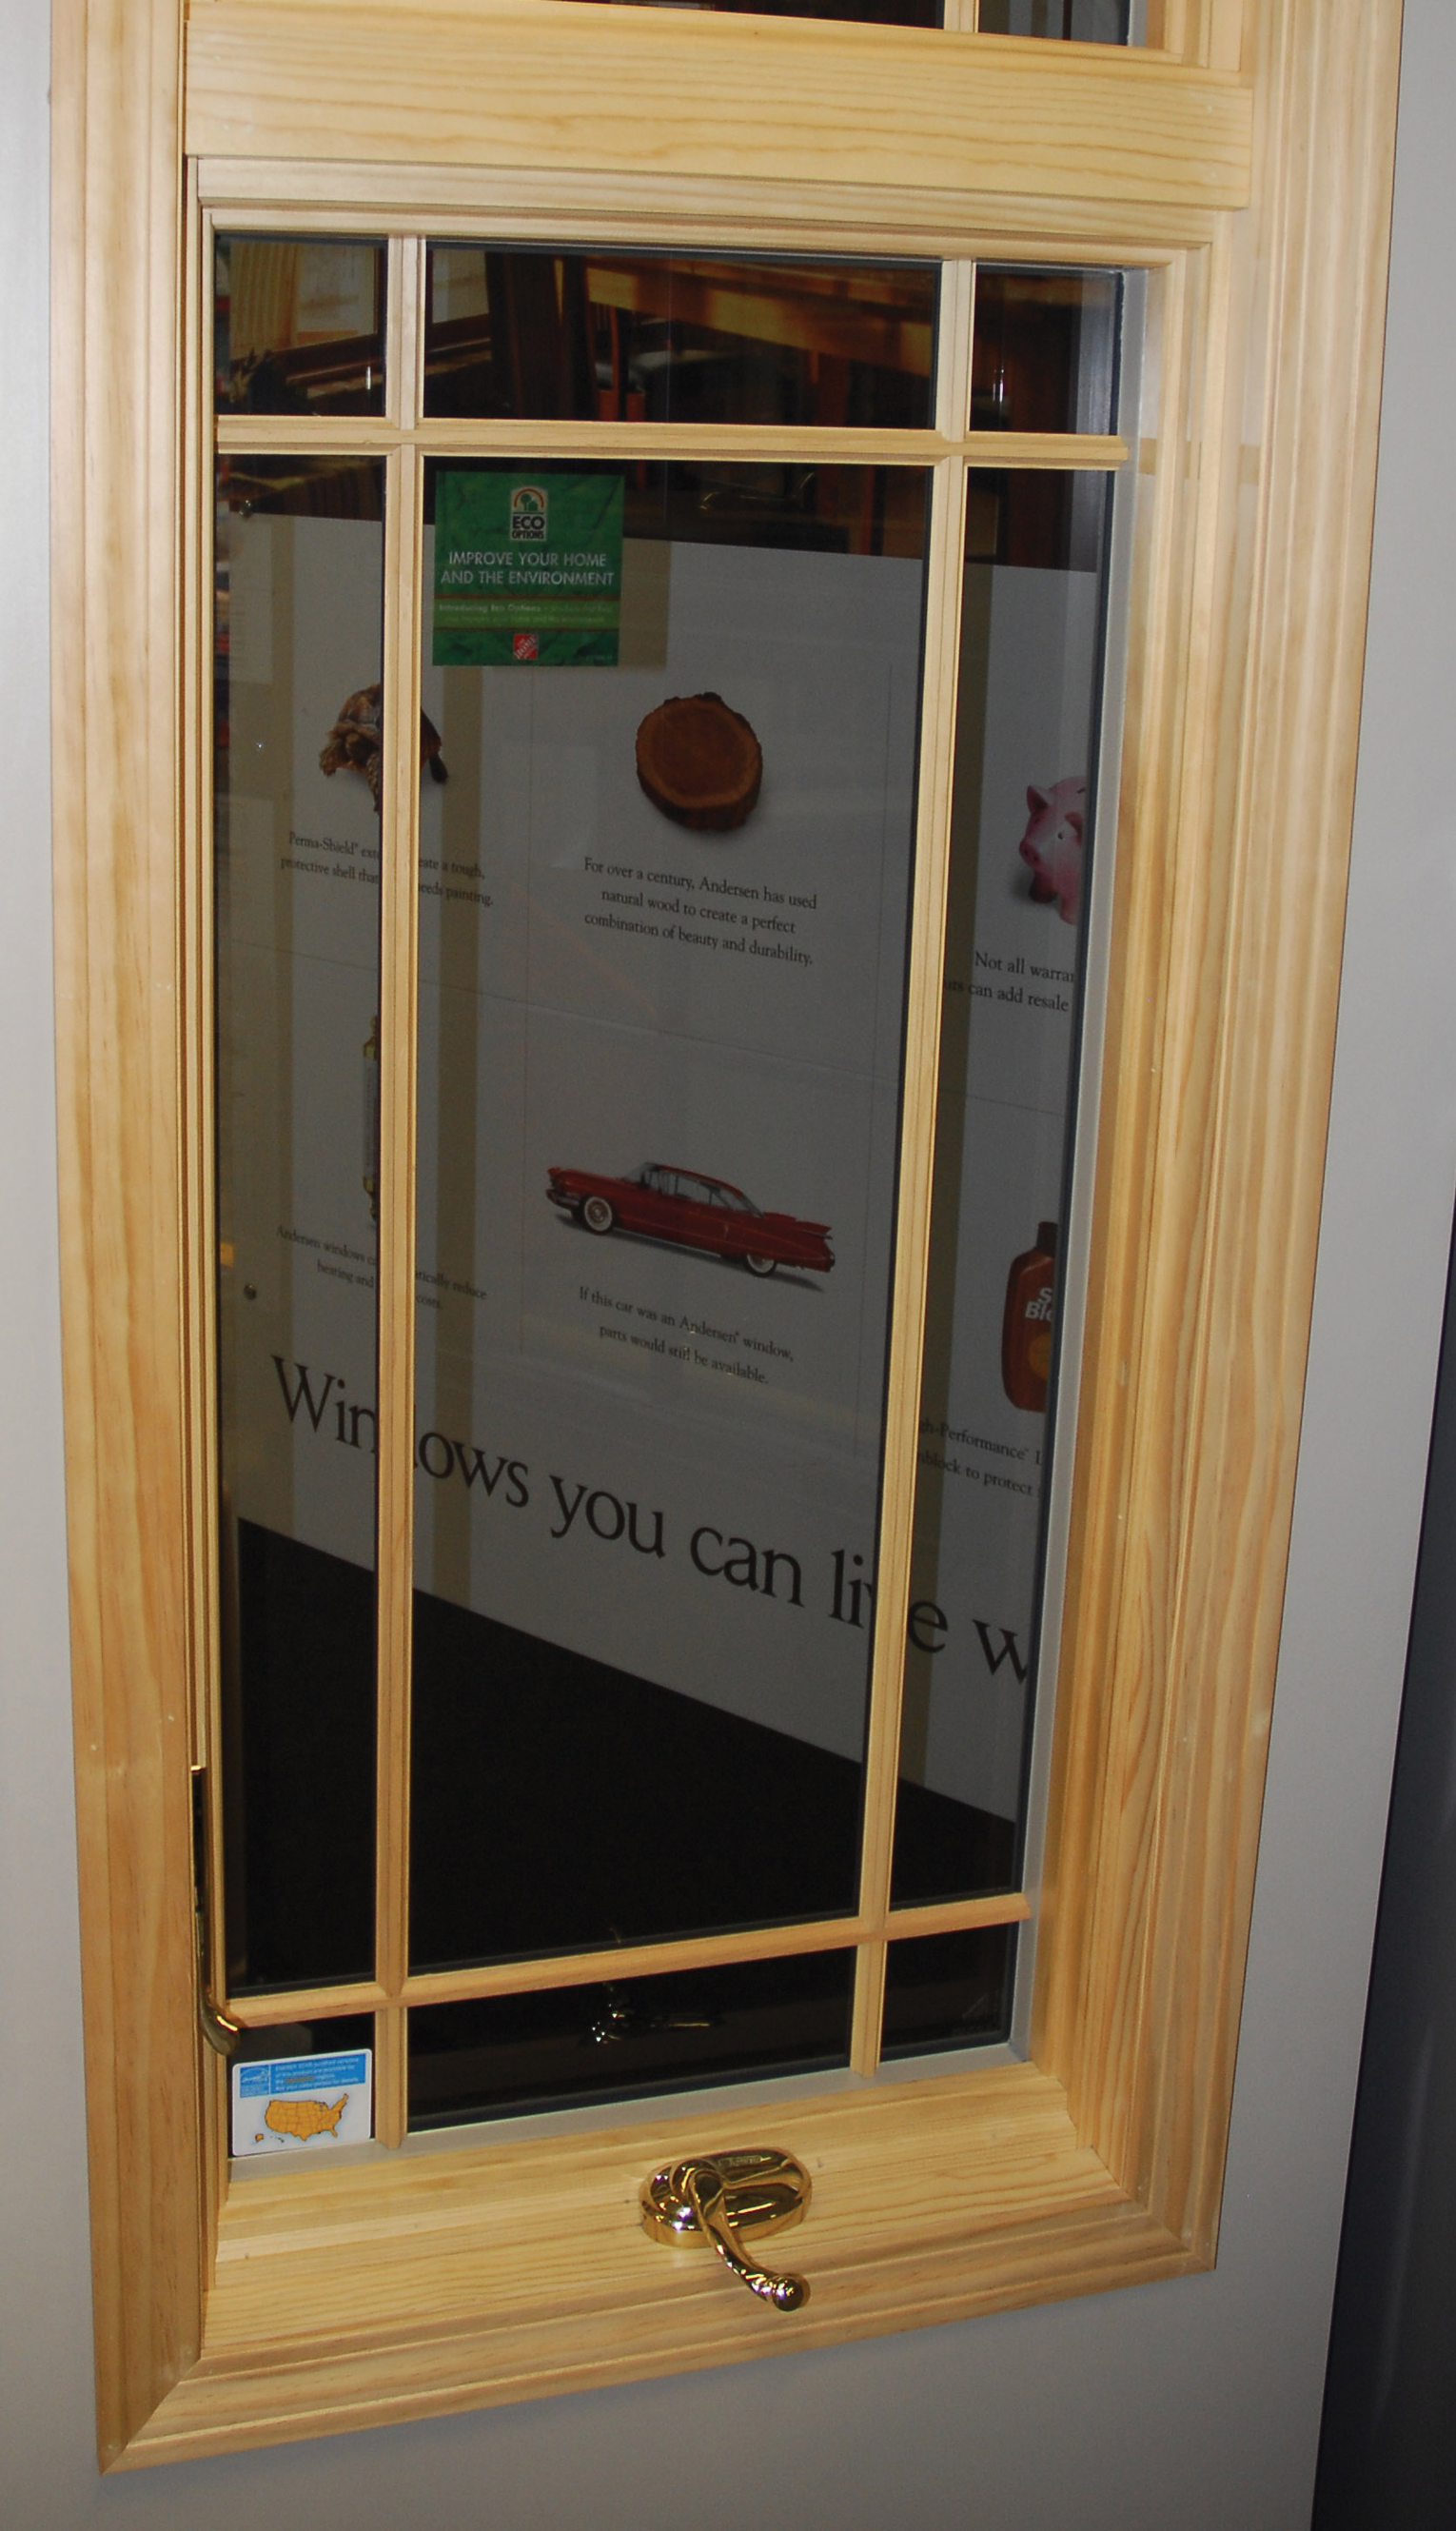
Figure 4-17. This attractive window can be fitted with energy-efficient glass, impact-resistant glass, or both. The impact resistant glass consists of a laminate or film sandwiched between two glass panes. The frames are reinforced and the hinges have an extra fastener to withstand high winds. During a wind event, debris may crack the glass, but the laminate will hold the windowpane together in the frame and prevent breaching of the wind- and rain-resistant envelope. After the storm, the glass will need to be replaced.
Plywood
Plywood has been the most commonly used option for protection of window openings due to its low cost and ease of availability. Plywood covers (Figures 4-18 and 4-19) should be secured with fasteners, screws, or clips depending on the type of construction and exterior veneer of the structure. To ensure performance, nails should never be used to secure plywood. Plywood offers a limited amount of protection in moderate level storms and only if it is properly installed.
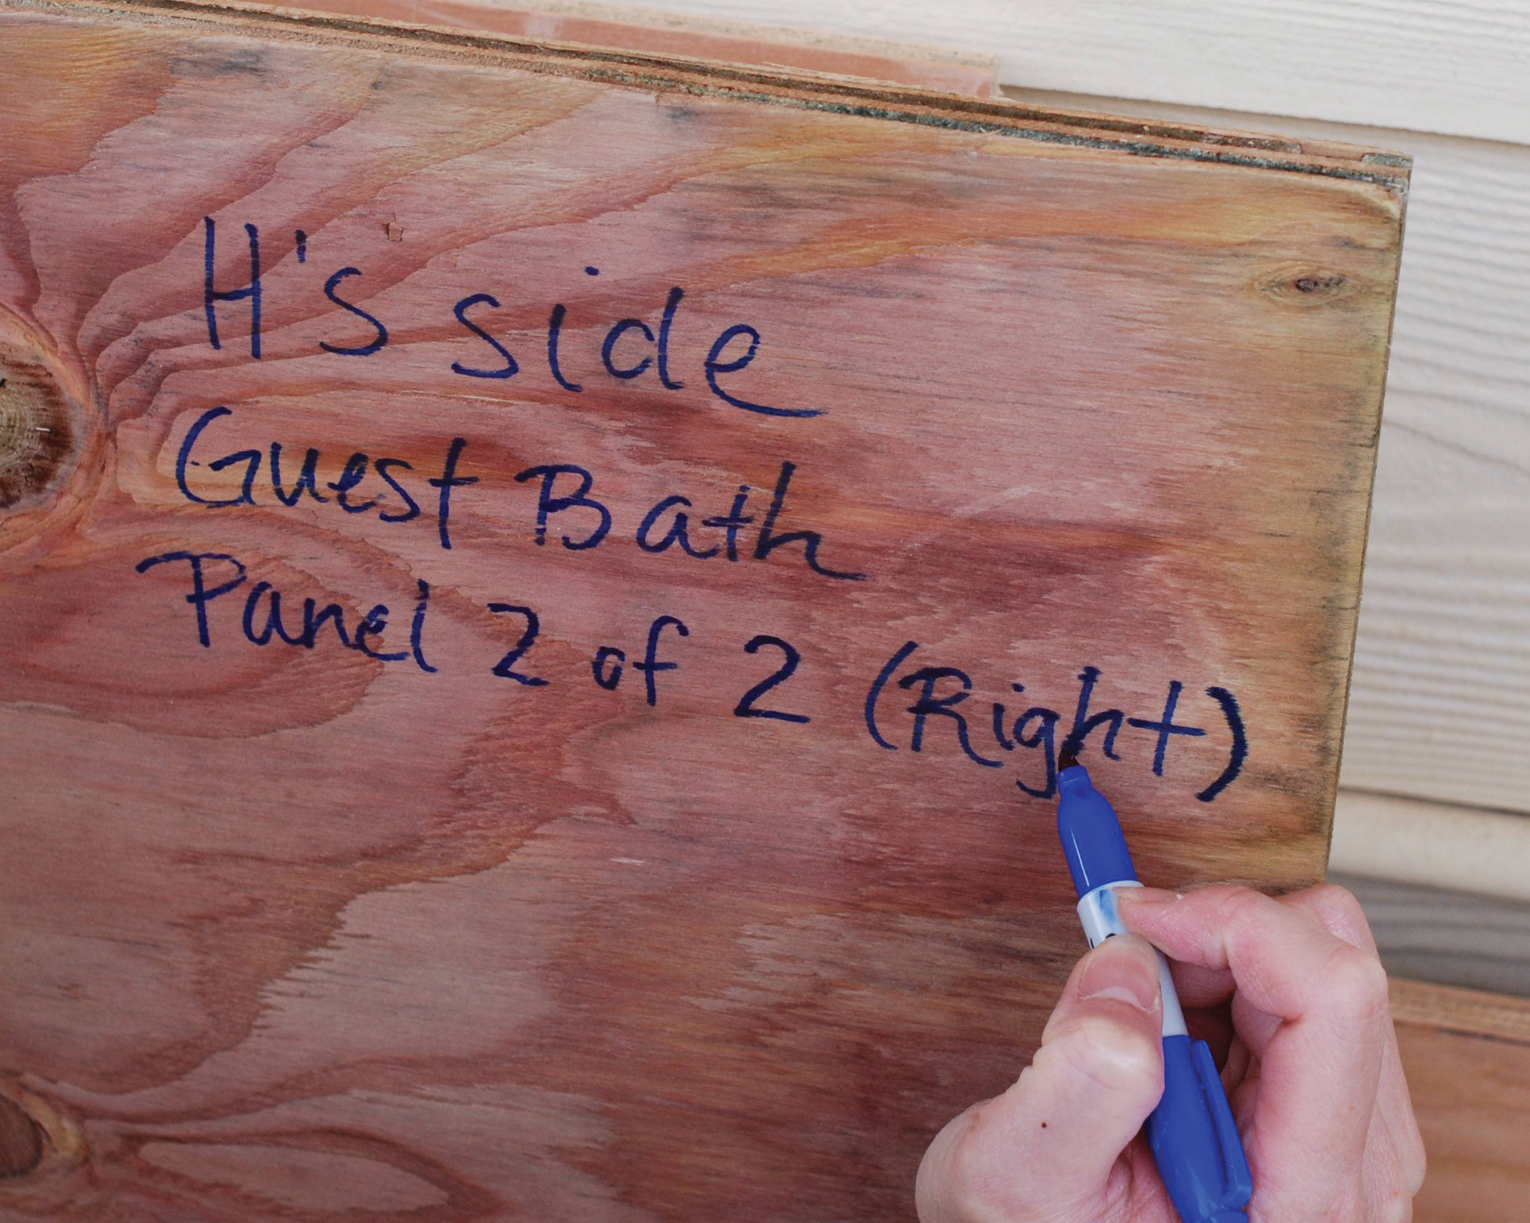
Figure 4-18. After the plywood is cut for each window, each piece should be labeled so the panels for one window are not mixed with those for another. It would also save time to indicate on the panels, well before any threat of a storm, where the fasteners will be attached.
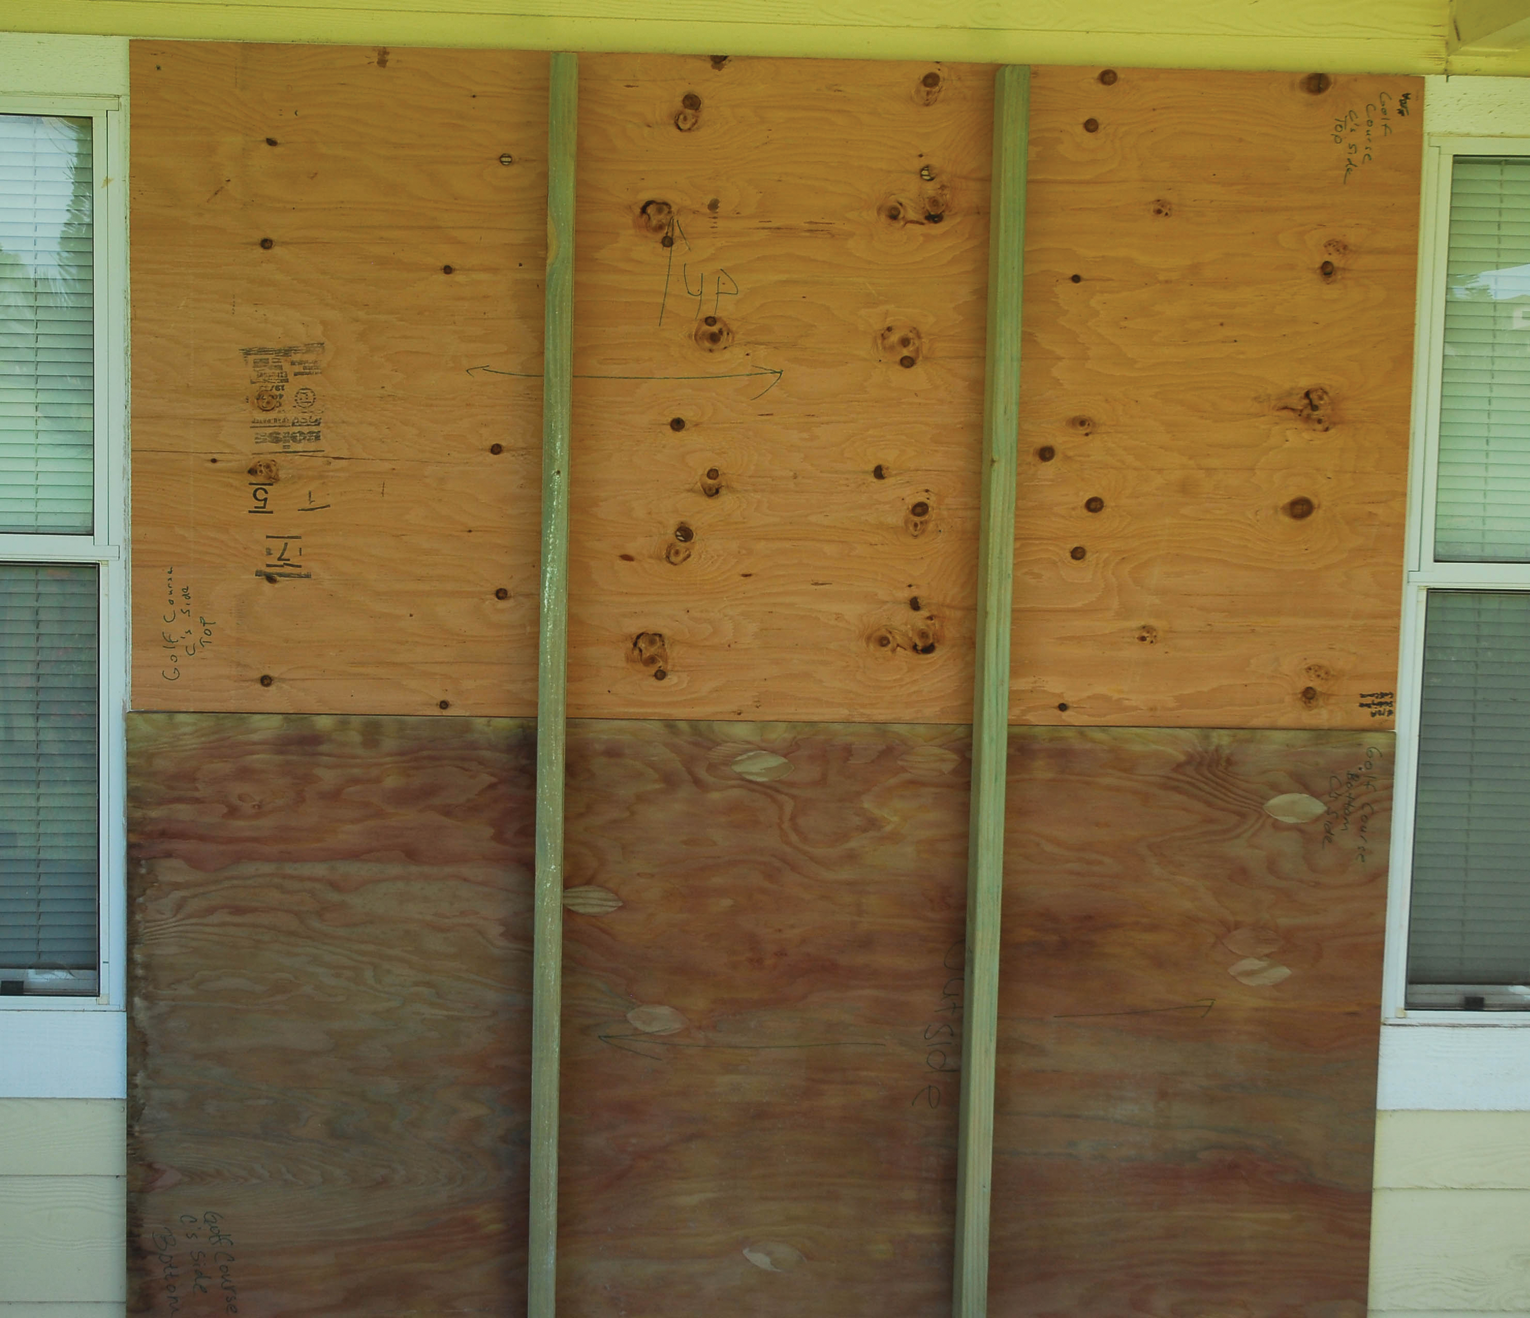
Figure 4-19. For larger windows, such as this sliding glass door, two 2x4s face outside and are oriented with the narrow end against the plywood. The fastening screws attach from the plywood into the 2x4.
The disadvantages of plywood are that it can rot or warp if stored in a wet or warm area. In addition, plywood sheets are relatively heavy. You will need two people to help with the preparation and deployment of these window coverings. Because of their weight, if would be difficult, or even dangerous, to install plywood sheets if a ladder is needed.
Most significantly, however, plywood is increasingly viewed by both code and insurance entities as an inadequate means of protecting openings. While the International Residential Code (and other similar codes) allows some use of plywood under very specific conditions, these are restricted to areas where the design wind speed is 130 miles per hour or less. Simply put, plywood does not demonstrate the levels of performance achieved by the engineered shutter types.
Window Film
An after-market product used to enhance glass breakage characteristics is commonly known as security window film. Such products are often touted as “hurricane film” or similar, claims that cannot be substantiated by testing. Application of any of these window films to existing windows does NOT constitute adequate opening protection and should not be considered for use as opening protection. For more information, visit the website of the International Window Film Association (IWFA).
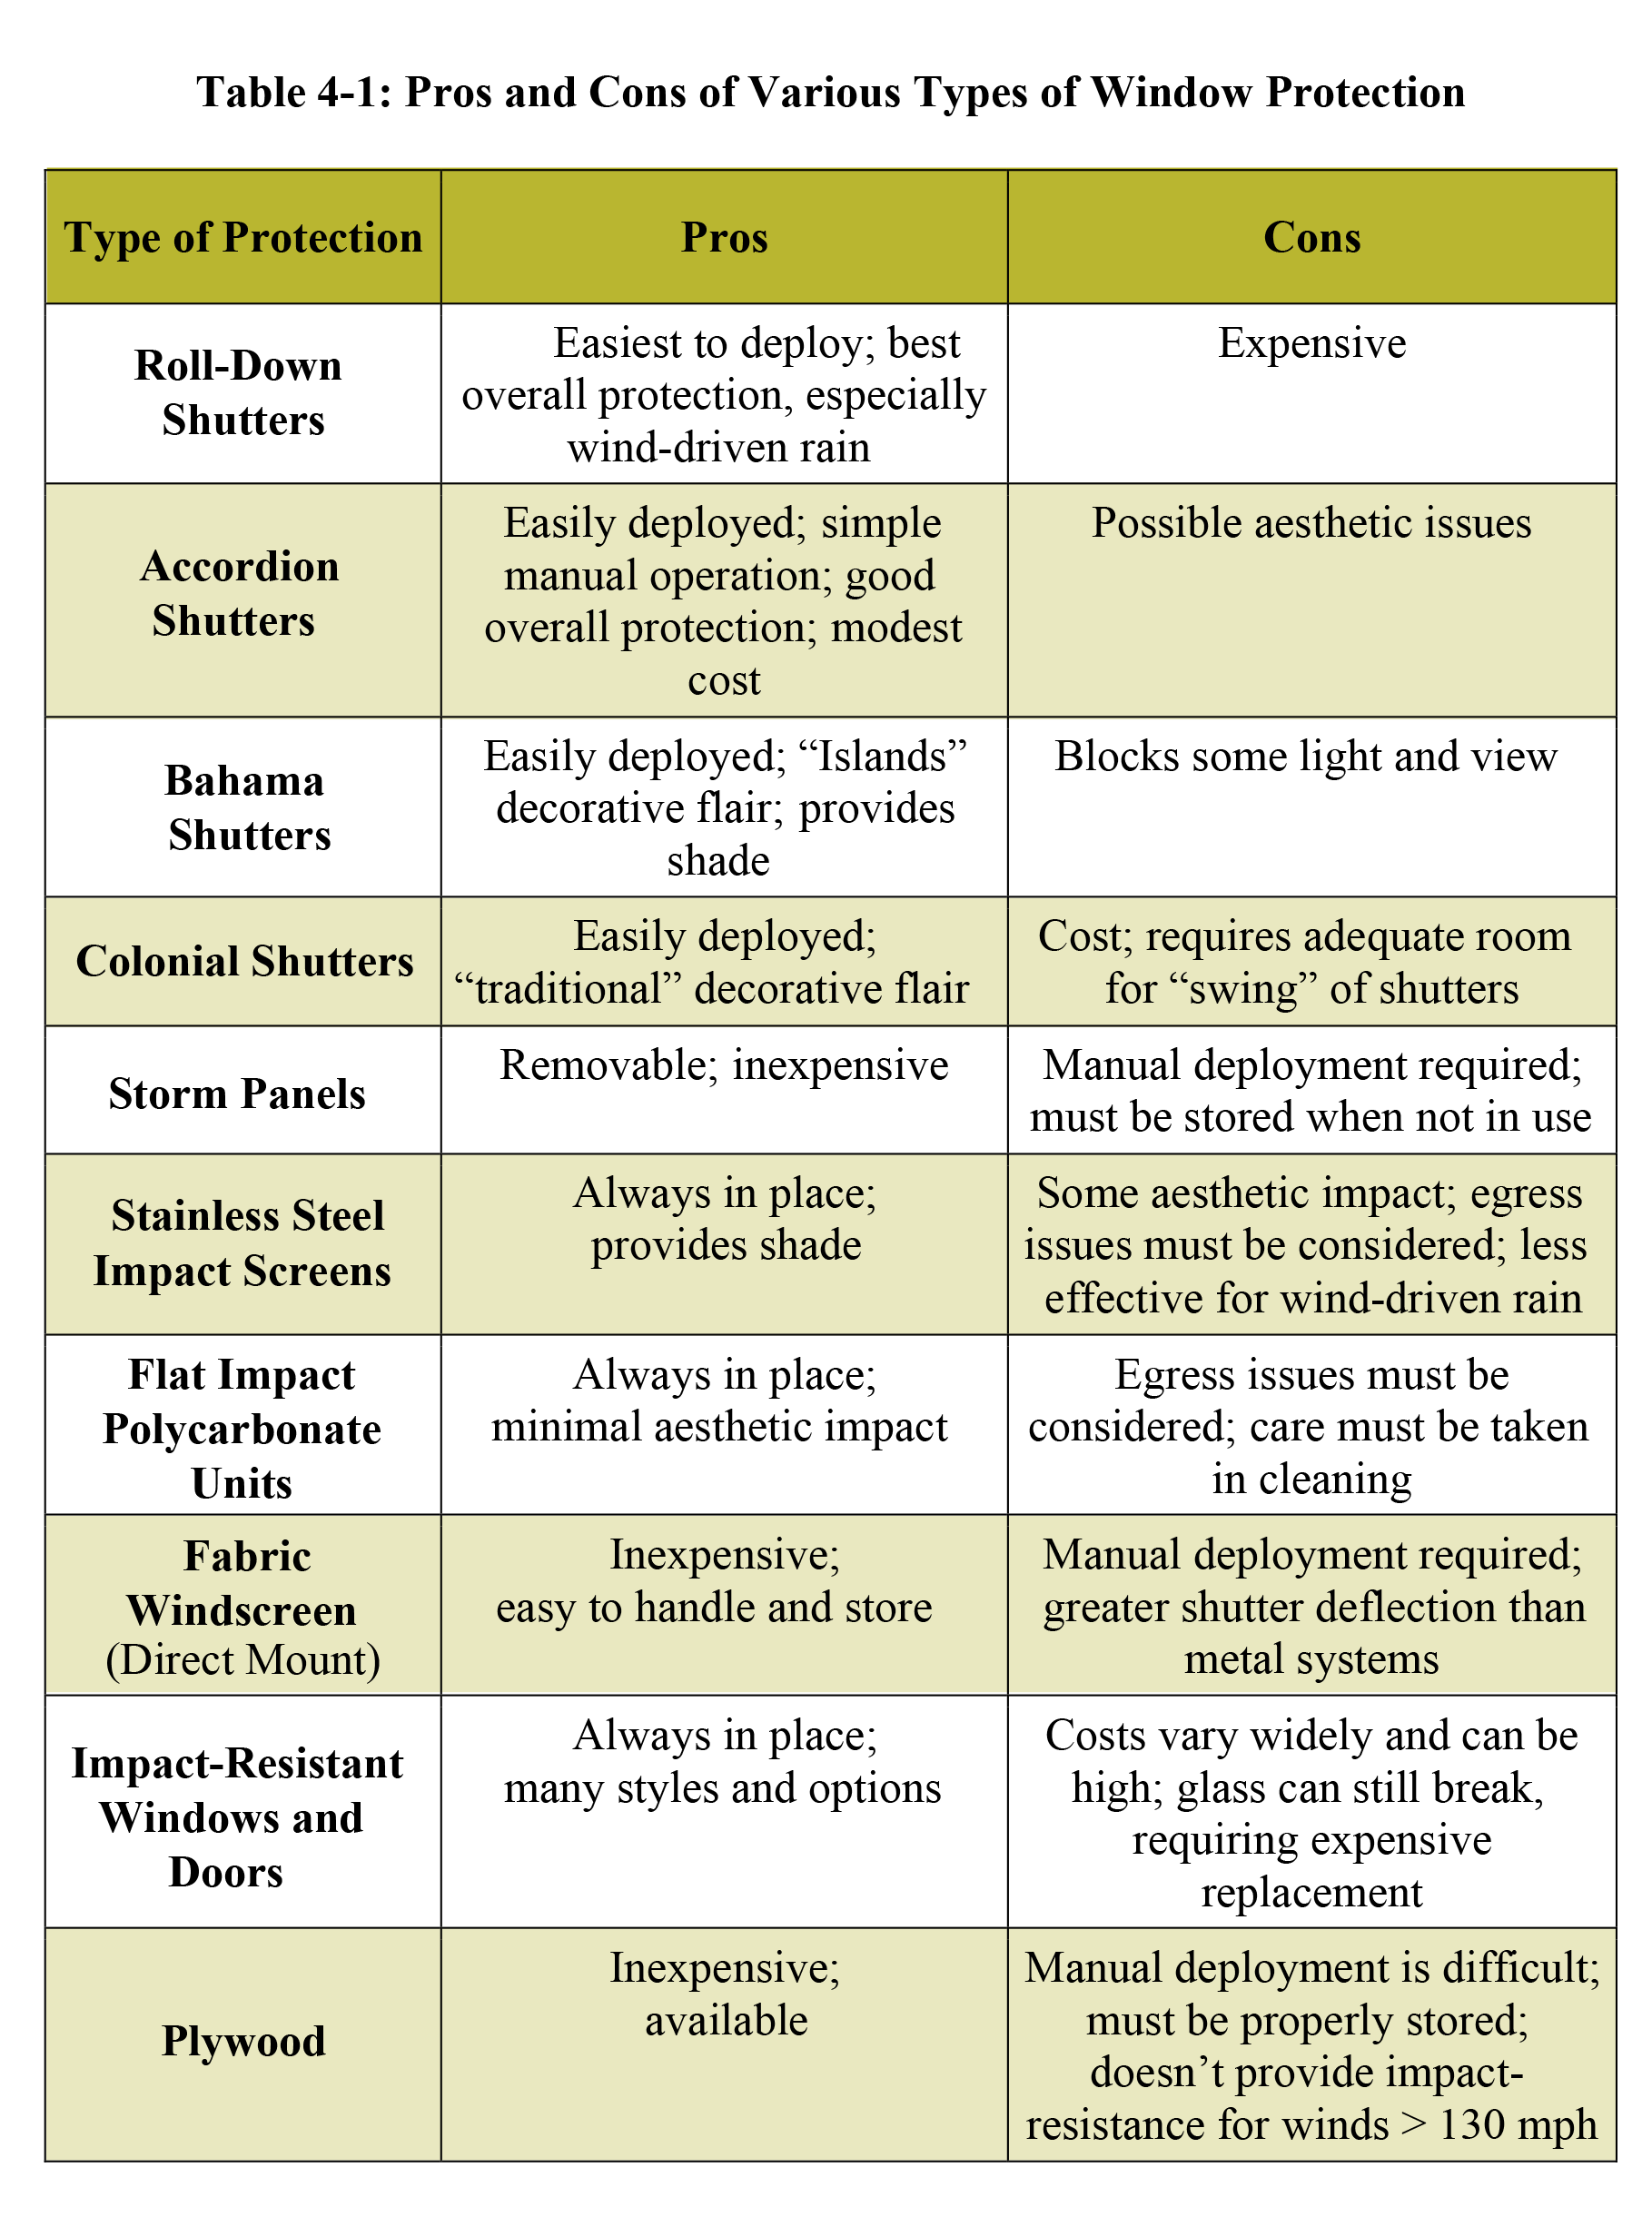
For further information regarding opening protection, visit the IBHS website and review its Fortified for Existing Homes program. Table 4-1 lists the advantages and limitations of each type of window covering discussed above. For most homes, a combination of different covering types is employed, based on the needs and budget of the homeowner.
Impact-Resistant Garage and Entry Doors
One of the most important yet frequently overlooked openings in a home that also requires protection are its doors — both the garage door and entry doors. Most major suppliers of both types of doors offer products (with or without glazing options) that meet both wind and impact resistance requirements. Often, replacement of a non-rated door with one of these newer types is cost-effective when compared to the cost of providing a covering for the door. As with impact-resistant glazed windows and doors, any replacement of a door with an impact-resistant garage or entry door should be done by a qualified professional installer.
The garage door is a significant weakness during a hurricane due to its large area and the stress it is subject to, and its failure can cause extensive damage to a structure. Garage door options include: (i) replacement with a stronger door, (ii) horizontal bracing, (iii) vertical bracing, or (iv) other types of bracing kits (see Figure 4-20). For many garage doors, vertical bracing is a popular and reasonably priced option.
Double entry doors should have slide bolts at the top header and bottom threshold of the inactive door, a deadbolt with at least 1-inch throw length between each door, and three hinges attaching the door to the frame. Single entry doors should have three hinges and a bolt long enough that it goes into the 2x4 framing of the door. Whenever entry doors are fortified, at least two of them must be operable for access and exiting at any time.
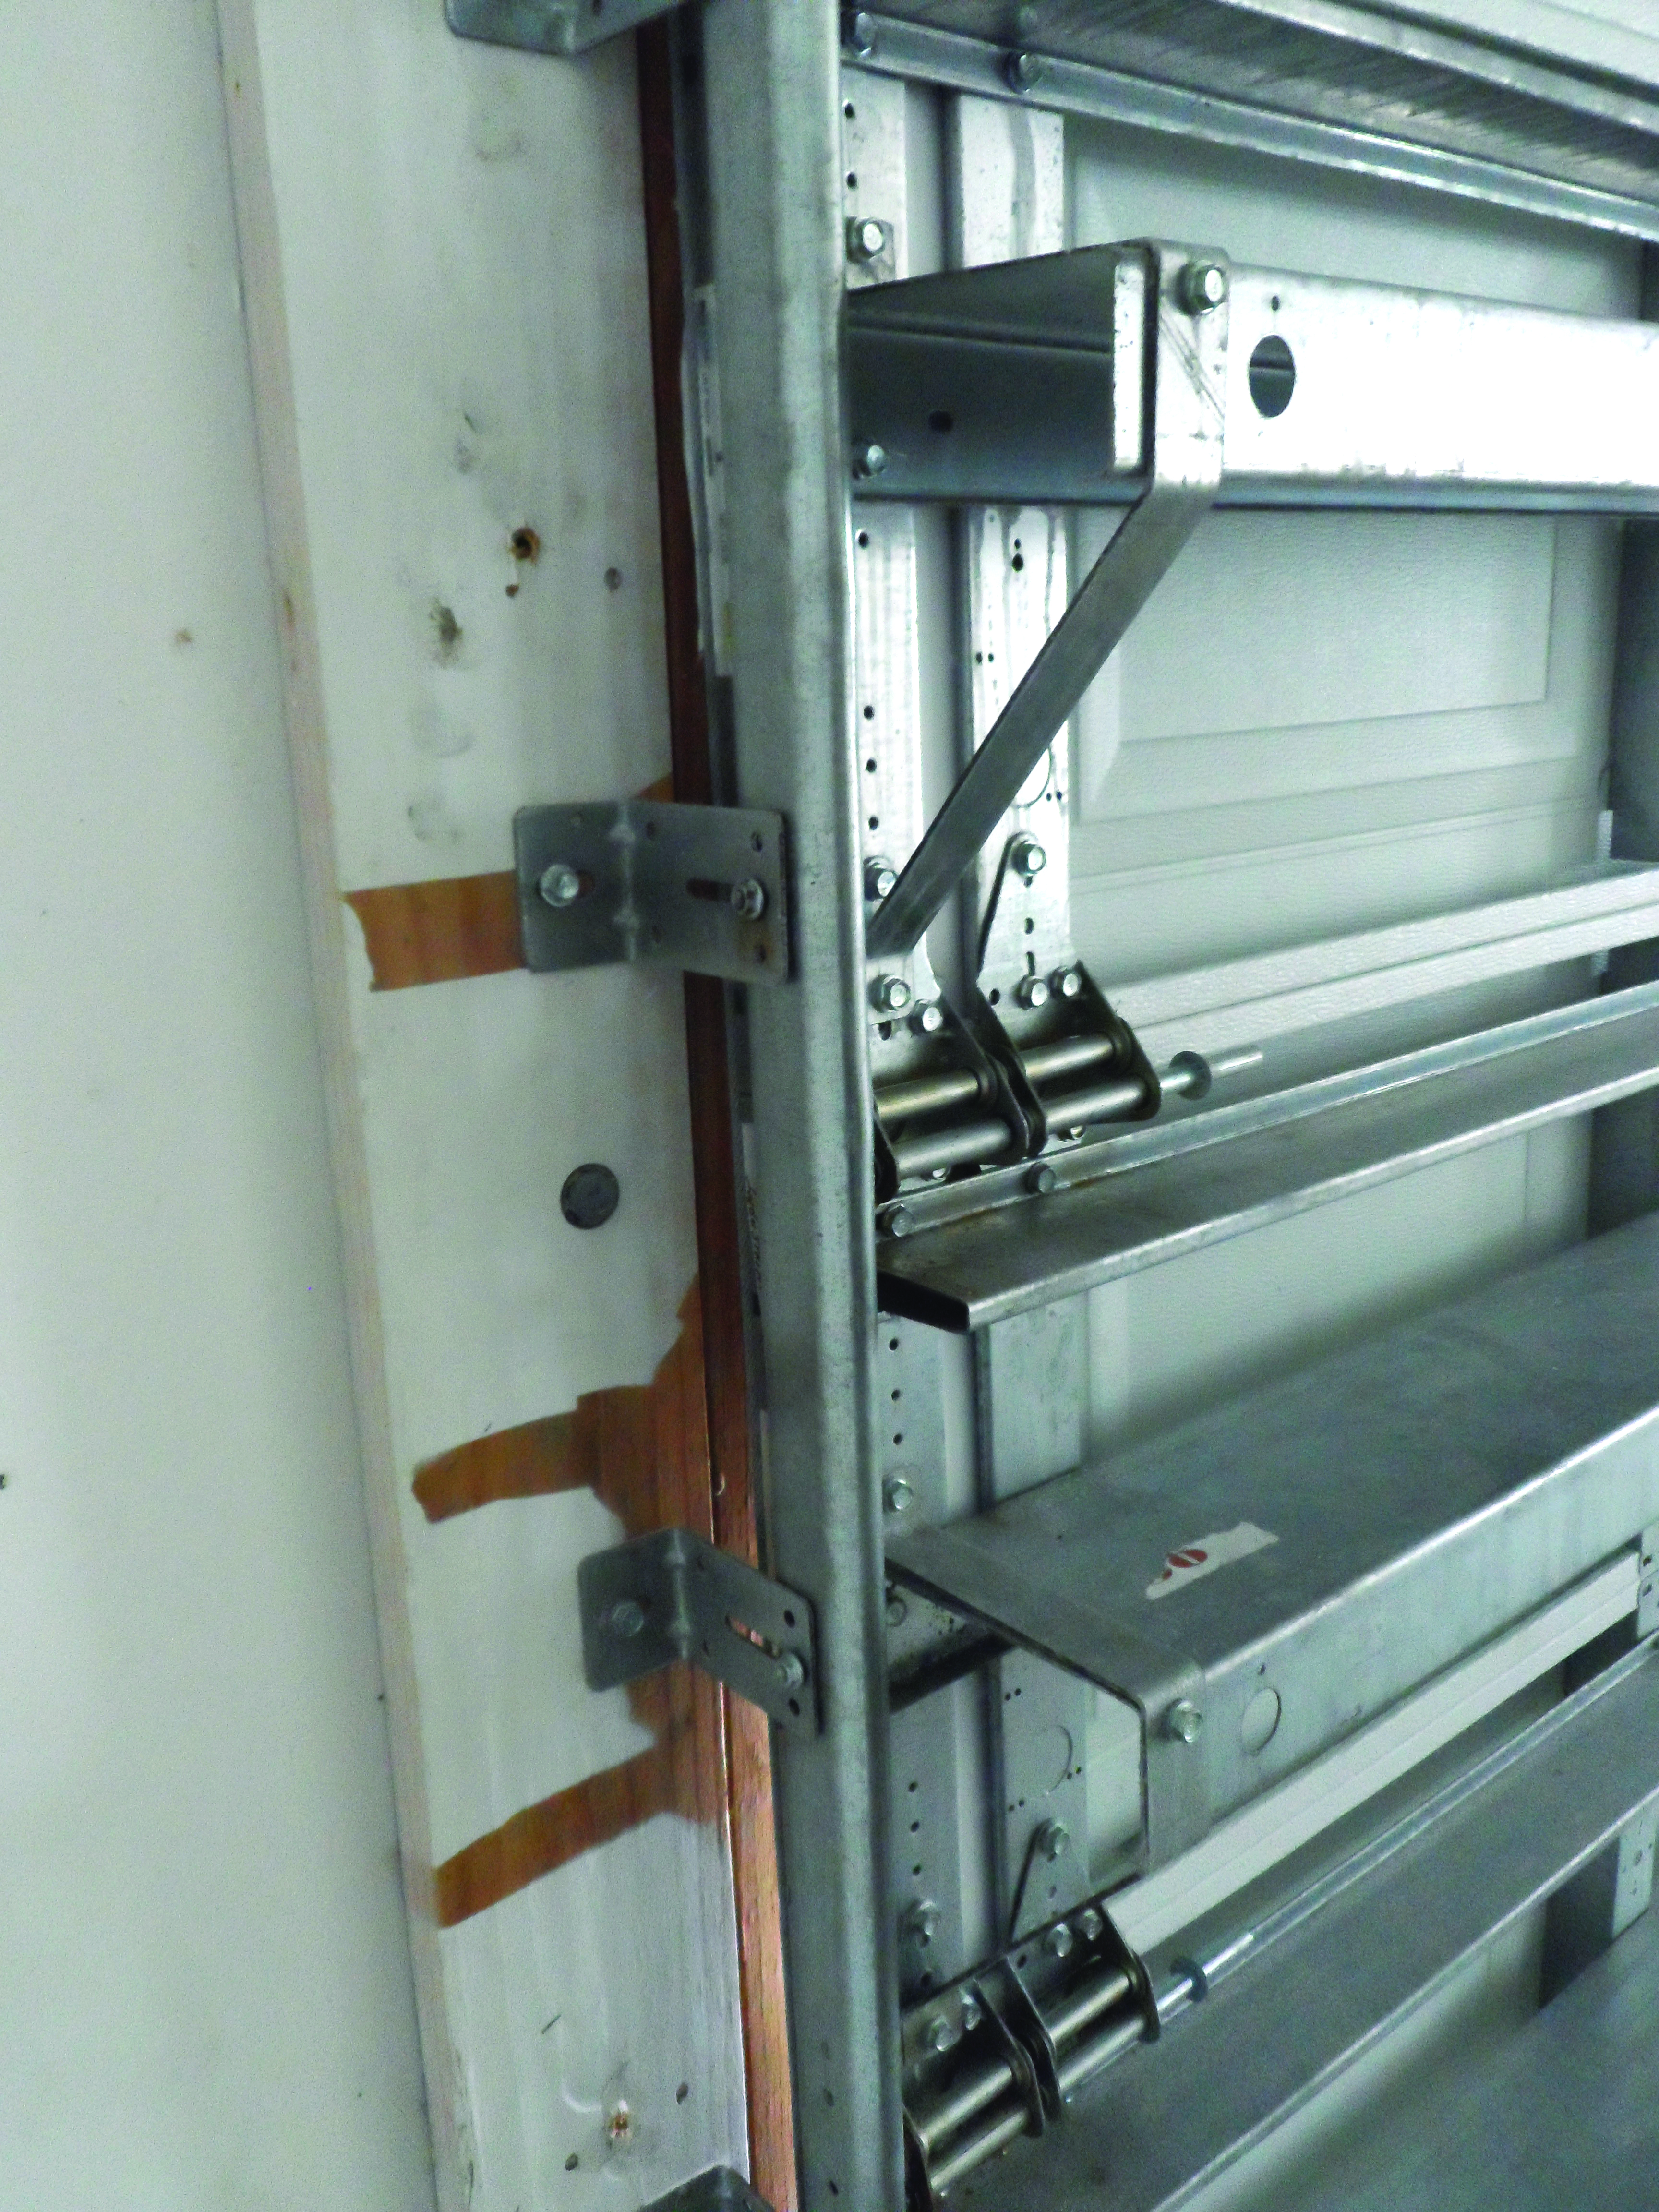
Figure 4-20. Fortified Garage Door: This replacement garage door is fortified with heavy duty metal bracing on every panel and stronger brackets connecting it to the door frame.
Source: Texas Sea Grant
Trees
Cutting or trimming trees that overhang your house is an additional measure you can take to protect your property during a hurricane. Even though trees provide a buffer to the full strength of the wind, there is a serious danger if there are large trees or limbs that are close enough to fall on the house. Tree limbs or branches falling onto or impacting your house will cause considerable damage — few roofs are strong enough to withstand a falling 20-inch diameter tree. FEMA recommends that the distance between a tree and your house should always be greater than the height of the tree when it is fully grown (Figure 4-21). This is to prevent a tree from falling on the roof, either at its current size or in the future.
If it is not possible to remove a tree, you can at least cut off all branches that hang over the roof of the house. Generally, you should hire a licensed tree trimmer to perform this work. A Tree Care Kit related to disaster preparation and recovery is available from the Texas A&M AgriLife Extension Service.
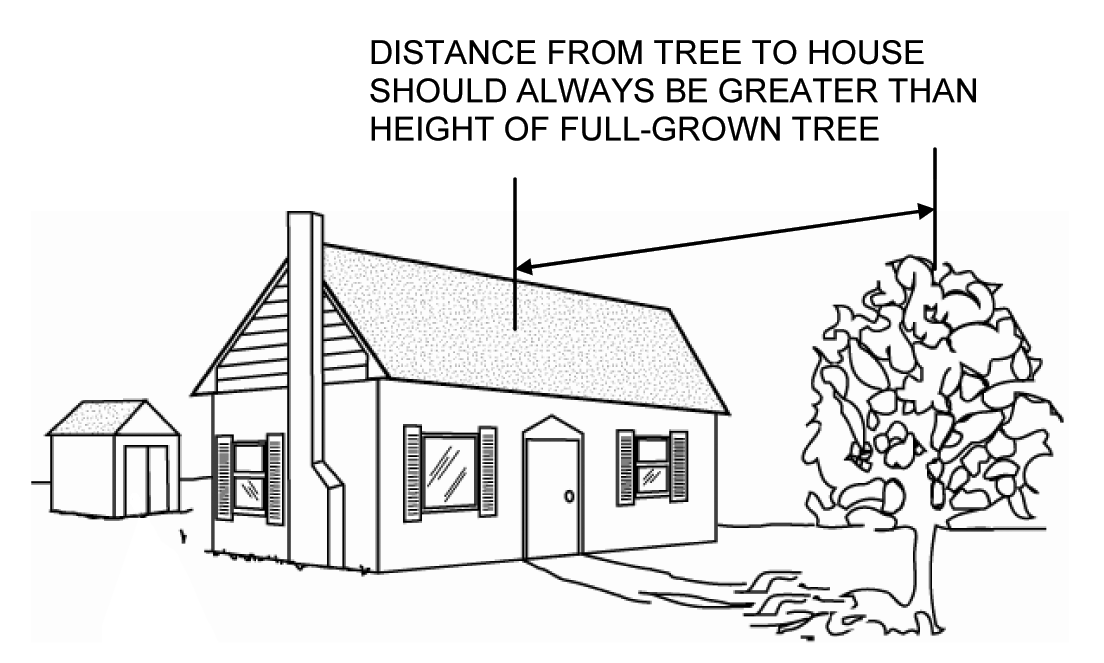
Figure 4-21. FEMA Recommended Distance from Tree to House
Source: FEMA's "Protecting Your Property from Wind"
